Pumpkin Bolognese

Pumpkin Bolognese | My Engineered Nutrition

Sometimes when I'm thinking of a new recipe I can almost taste the flavors, even before I begin making it. Other times, it can turn out completely opposite of what you thought it would taste like - both good and  bad. 

This, my friends, is one of those recipes; one of those times when the flavors totally caught me by surprise and turned out better than I could have expected! 

In my excitement of creating a surprisingly tasty dish, I of course blasted my mom, sister, boyfriend and best friends with photos of the dish, exclaiming "PUMPKIN BOLOGNESE!!!". Each time I got back the response "so, does it taste super pumpkin-y?". I'm sure you are all asking yourselves the exact same question. I mean, pumpkin is in the title of the recipe for goodness sake! 

Pumpkin Bolognese | My Engineered Nutrition

First, let's rewind. I'd like to explain why pumpkin was used to begin with. A bolognese is simply an Italian meat-based sauce. Contrary to popular belief, it is not a tomato-based sauce with meat added. In fact, the original bolognese is said to have been beef, onion and carrots cooked with butter butter and then covered and cooked with broth. As the recipe evolved, tomato was eventually added.

While I LOVE tomatoes, sadly I've discovered it is best for my skin if I don't eat them or any other member of the nightshade family, for that matter. If you have an autoimmune disease (I'm lucky and only have psoriasis) your diet can have a huge impact on controlling your aliment. Nightshades (tomatoes, peppers, eggplant, white potatoes), dairy, nuts, eggs, grains and alcohol should be avoided. This causes me to get creative at times...which led me to subbing PUMPKIN for tomato paste in a basic bolognese. 

Pumpkin Bolognese | My Engineered Nutrition

The result will surprise you. If you are looking for a distinct taste of pumpkin in this sauce, you won't find it here. Instead, it is a hearty and rich meat sauce that has been slow cooked, allowing a depth of flavor to develop that you can't get by rushing. This will be a dish you want to come home to as the night become a little cooler and the dark comes a little sooner. 

Pumpkin Bolognese

Prep Time: 5 minutes

Cook Time: 2 hours 10 minutes

Servings: 4

Ingredients: 

  • 1 tbsp grass fed butter
  • 1 cup onion, minced, chopped
  • 1/2 tsp garlic, minced
  • 1/2 tsp salt
  • 1/4 tsp pepper
  • 1/2 tsp fresh thyme, finely chopped
  • 1 lb ground beef (90% lean, 10% fat)
  • 1 cup pumpkin puree
  • 2 cups chicken bone broth, homemade or store bought (such as Pacific)
  • 2 bay leaves

Directions:

  1. In a large pot, melt butter over medium heat. Saute onion and garlic until the onion become translucent, about 5 minutes. Once the onions have cooked, add fresh thyme, allowing it to become fragrant. 
  2. Add ground beef and brown. While cooking, break up with a spoon so that no large pieces form. Continue cooking until all pink is gone, another 5 minutes. 
  3. Once mixture has fully cooked add beef broth and pumpkin puree. Increase heat to medium high and bring to a boil. When a boil has been reached, add bay leaves and reduce to a simmer. Allow sauce to cook uncovered for roughly 2 hours. 
  4. As the sauce cooked, the liquid will cook down. During the 2 hours of simmering, whenever the sauce becomes extremely thick add 1 cup of water, stir, and continue to simmer and cook down the sauce. I ended up adding water 3 times during the 2 hour total cooking time. Don't rush this step! This is where the flavors develop.
  5. Once the sauce has cooked serve over prepare spaghetti squash or preferred alternate pasta. 

Nutritional Information (1 cup of sauce)

280 calories - 23 g Protein, 8.5 g Carbs, 16.7 g Fat
Posted on October 13, 2015 and filed under Recipes, Beef.

Pumpkin Protein Waffles

Pumpkin Protein Waffles | My Engineered Nutrition

Where the heck did Summer go? I feel like I blinked and all of a sudden, it's October. Rather than dwell on the fact that this year is racing by, lets celebrate with all things pumpkin! 

Since moving to California, I really miss seeing the seasons change. We have no turning leaves or crisp Fall air (unless you can count fog?). We do, however, have plenty of pumpkins! It may be sunny and 70 outside, and I may still be spending my weekends out at the beach, but in my kitchen - it's full on FALL!

Pumpkin Protein Waffles | My Engineered Nutrition

I love using pumpkins in baked goods. Not only does it add flavor, it can also be a substitute for oil or butter in a recipe. Delicious fall flavors AND low fat? Yes, please!

Waffles are one of those decadent, once in a blue moon special indulgent breakfast or brunch items. Normally, these are loaded with sugar and high in fat. If you are like me, you love waffles and want to be able to eat them whenever you damn well please. Enter: Protein Waffles. 

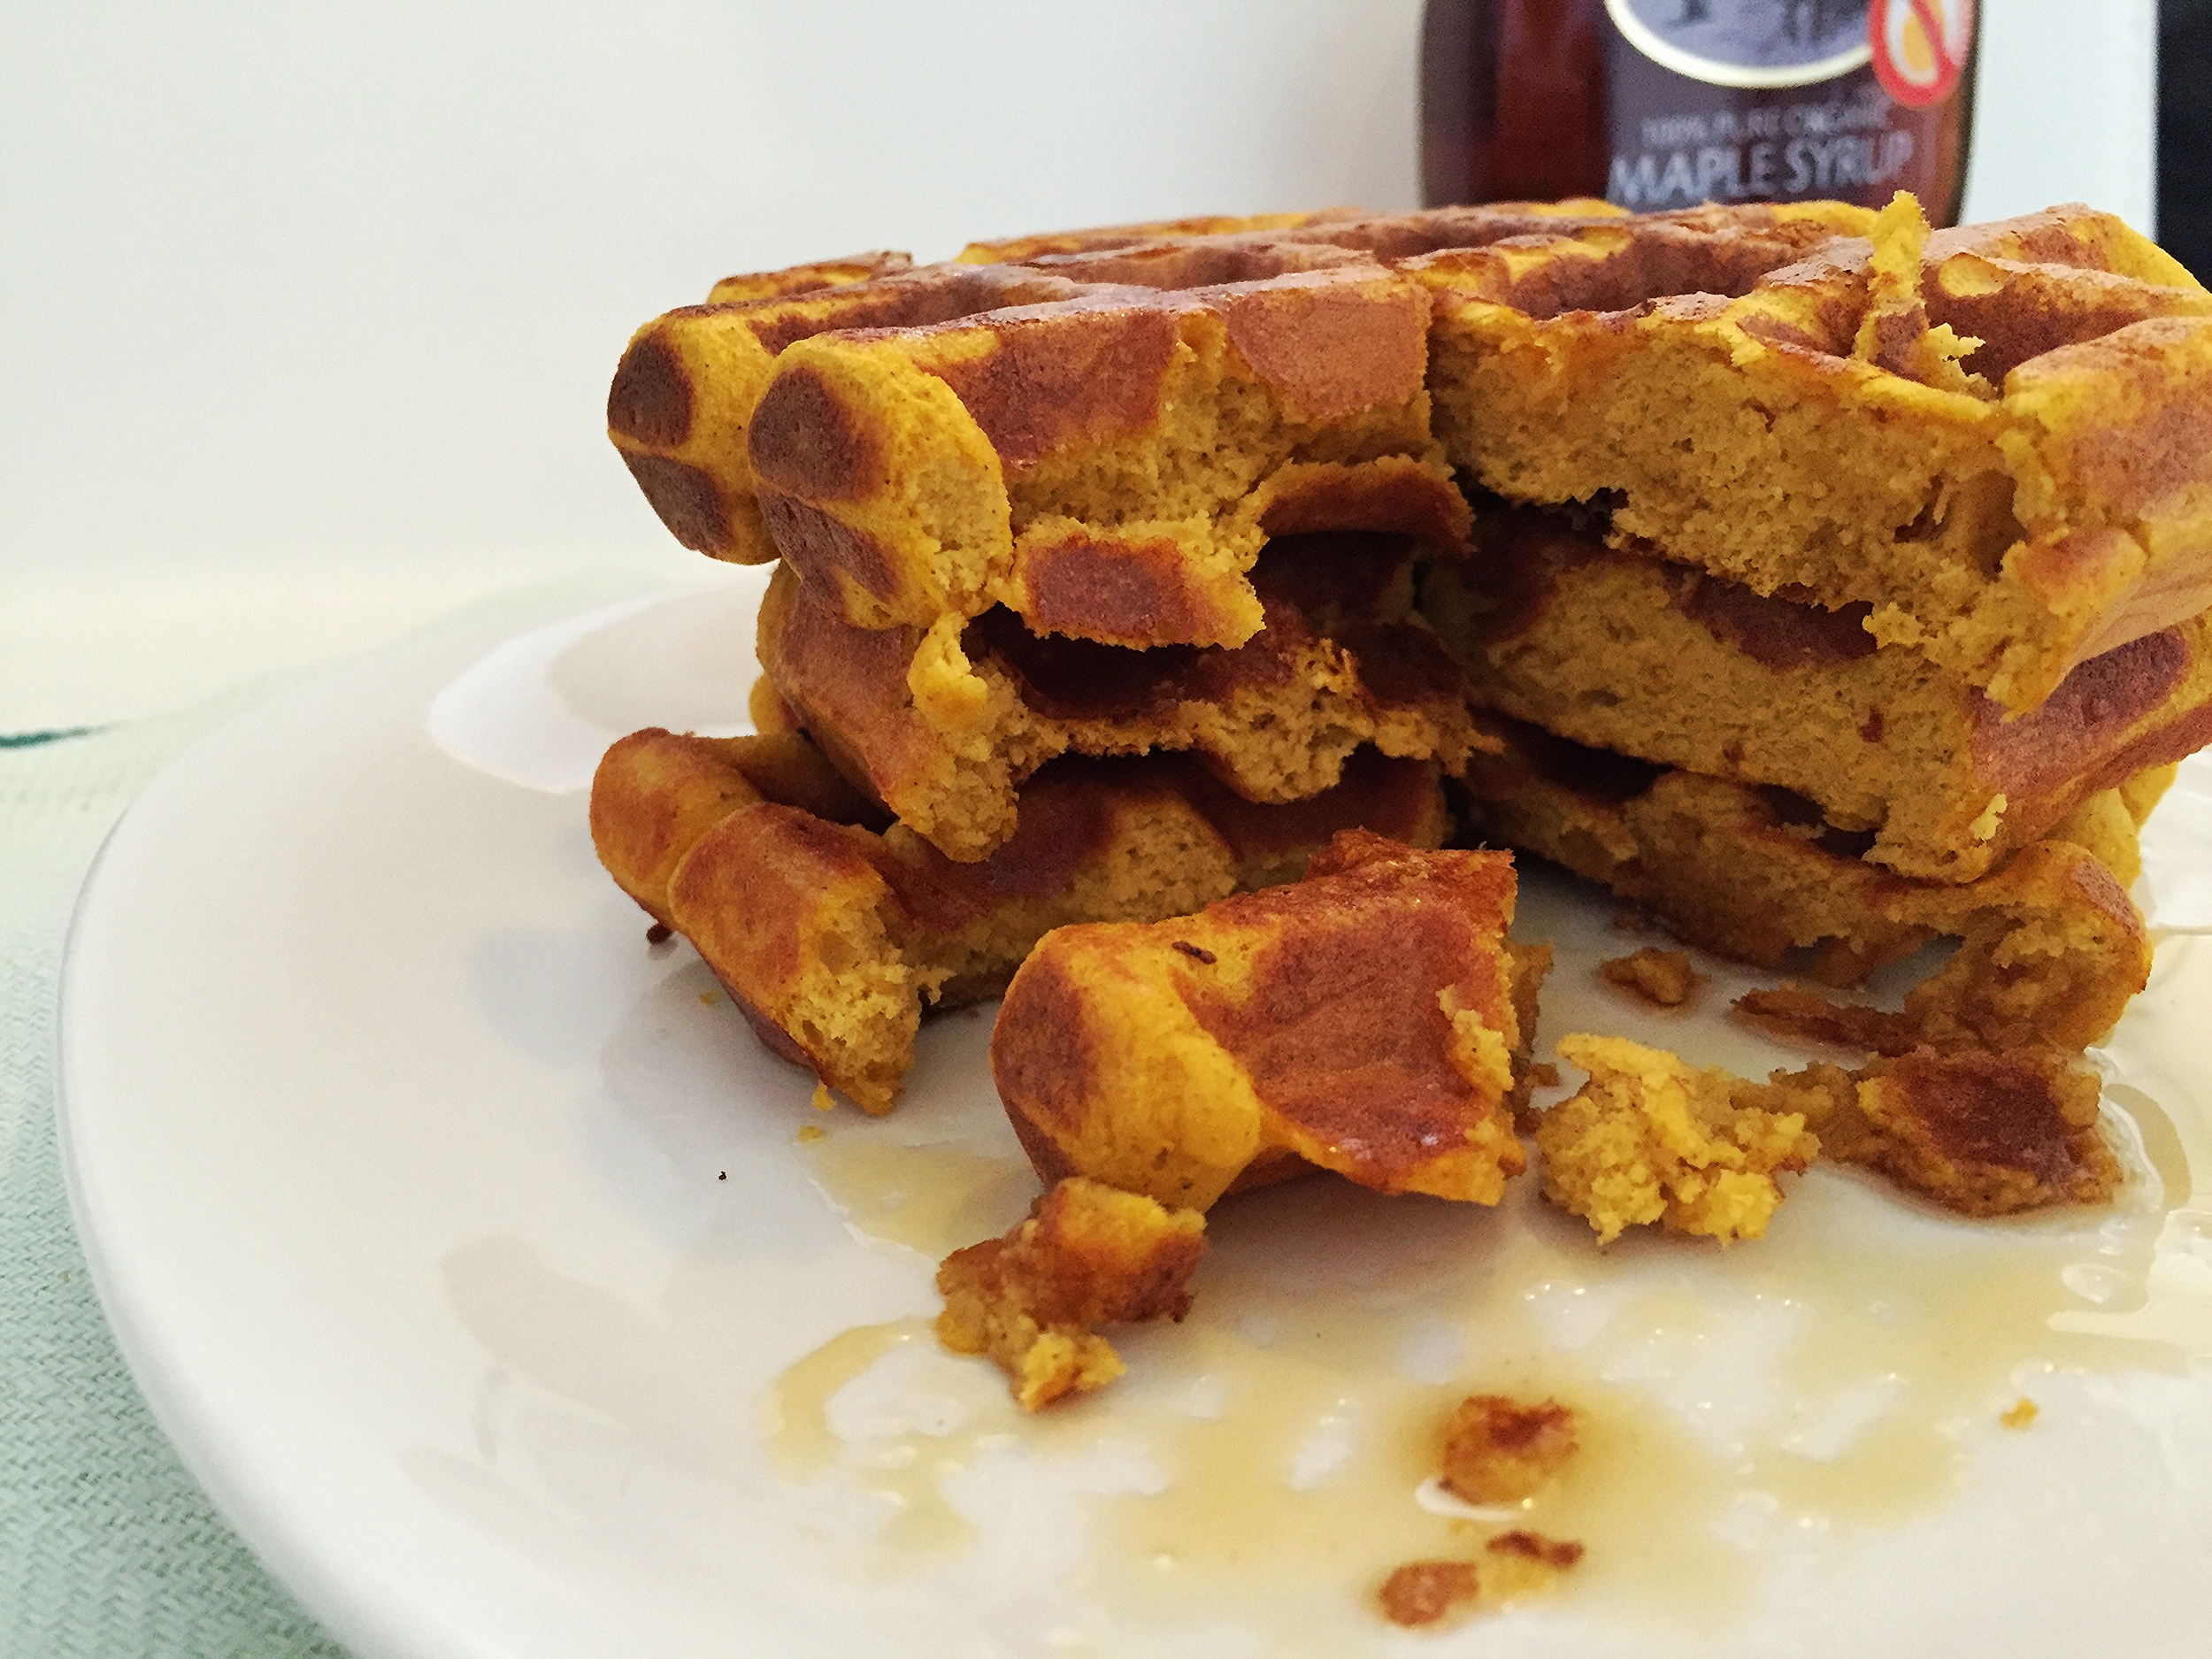
image.jpg

We have two secret substitutions in these waffles: protein powder (instead of flour) and pumpkin purée (instead of butter). These waffles SCREAM fall and are so easy to make its stupid. They are still crispy on the outside and soft and chewy in the inside. These are a perfect post-morning-workout treat. Each waffle packs 11 GRAMS of protein and less than 3 grams of fat!

Do yourself a favor and make a double batch of these waffles and freeze whatever you don't eat so that you can have these any day of the week!

Pumpkin Protein Waffles | My Engineered Nutrition

Pumpkin Protein Waffles

Prep Time: 5 minutes

Cook Time: 5-10 minutes

Servings: 6 waffles

Ingredients:

  • 2 scoops (1/2 cup) whey protein powder, vanilla 
  • 1/2 cup brown rice flour
  • 2 tsp baking powder
  • 1/2 tsp pumpkin pie spice
  • 1/4 tsp salt
  • 1 cup pumpkin puree
  • 2 eggs
  • 1 tsp vanilla extract
  • Optional topping: pure maple syrup

Directions:

  1. Preheat waffle iron according to manufacturer's directions.
  2. Combine all ingredients in a blender (except the syrup), incorporating into a batter.
  3. Ladle recommended amount of batter onto waffle iron. Close top and cook until waffle is golden brown and removes easily from waffle iron, about 2-4 minutes. Continue making waffles with remaining batter. Serve immediately. 

Nutritional Information (2 waffles):

250 calories - 22 g Protein, 30 g Carbohydrates, 4.7 g Fat


Posted on October 12, 2015 and filed under Recipes, Breakfast, Protein Powder, Baking.

Buffalo Chicken Nachos

Buffalo Chicken Nachos | My Engineered Nutrition

If someone were to ask me "what is the first food that comes to mind when you think of football", my answer without hesitation would be BUFFALO CHICKEN WINGS. They just go with football like peanut butter and jelly. Wings, a basket of fries and beer - doesn't exactly scream "healthy choices", right? 

While wings are great, I wanted to shake things up a bit and create a healthy alternative to the Gametime food we know and love. Why not combine buffalo chicken AND nachos?! These nachos have all the flavor elements you'd have with wings and a basket of fries...just in nacho form.

Buffalo Chicken Nachos | My Engineered Nutrition

 I'm using my Perfectly Baked Sweet Potato Chips as the base to this nacho creation. Because they are so crisp and perfectly baked, they stand up to the test of acting as nachos. Next, they are topped with shredded chicken that I've slow cooked with Frank's Hot Sauce (yes, 2 ingredients - does it get any easier?) and a goat cheese ranch dressing that is bomb dot com. 

Buffalo Chicken Nachos | My Engineered Nutrition


Buffalo Chicken Nachos

Prep Time: 20 minutes

Cook Time: 4 hours 10 minutes

Servings: 4

Ingredients: 

Sweet Potato Chips

  • 1 recipe of Baked Sweet Potato Chips (4 servings) 

Buffalo Chicken (this will make more than you need for the nachos) 

  • 2 chicken breasts
  • 1/2 cup Frank's Hot Sauce

Goat Cheese Ranch Dressing

  • 2 oz goat cheese  
  • 2-4 tbsp light coconut milk (or milk of your choice)
  • 1/4 tsp garlic powder
  • 1/4 tsp onion powder  
  • 1/4 tsp oregano
  • salt and pepper  

For nacho assembly: 

  • 4 servings Sweet Potato Chips
  • 1 cup Buffalo Chicken  
  •  Goat Cheese Dressing 
  • 2 scallions, thinly sliced
  • 1/4 cup cilantro, chopped

Directions:

  1. Start by making the Buffalo Chicken. Place chicken breasts in crock pot and coat with buffalo hot sauce. Allow to cook on HIGH for 4 hours.
  2. During the last hour of the chicken cooking, prepare your sweet potato chips by following the instructions in my previous post.  
  3. Also while the chicken is cooking, prepare the goat cheese ranch dressing. In a bowl, combine all ingredients and mix until a creamy dressing consistency is reached. I recommend to start by adding only 2 tbsp of milk. Check consistency - if it is too thick add more milk, tbsp by tbsp, until your desired consistency is met.
  4. Once chicken has cooked, shred chicken with forks within the crockpot. Mix chicken with the sauce within the crockpot - we don't want to drain this! 
  5. To assemble, on a parchment lined baking sheet arrange sweet potato chips. Top with 1 cup of shredded chicken. Next, drizzle ranch dressing over chicken and finish with scallions and cilantro.  

Nutritional Information (1 serving) 

200 calories - 15.5 g Protein, 21.5 g Carbohydrates, 6 g Fat

Posted on October 9, 2015 and filed under Recipes, Chicken.

Bison Sliders

Bison Sliders | My Engineered Nutrition

These little sliders are so much fun! Burgers aren't exactly an ideal food to serve during a party - they can get messy and are quite a filling meal to eat. If I'm watching a football game or at a cocktail party, I don't want my hands to be a mess from trying to eat a big ol' burger, I'd rather have easy to eat finger foods.

Fear not! These little sliders solve all these problems. These are absolutely perfect to serve during a party. They are an easy 2 bite slider packing a punch of flavor! They aren't overly heavy, as I've ditched the bun and cheese. With the flavors of the bison patty plus sautéed onions and mushrooms you get all the best burger qualities - in a single bite.

Bison Sliders | My Engineered Nutrition

Bison Sliders

Prep Time: 5 minutes

Cook Time: 10 minutes

Servings: 8 sliders

Ingredients:

  • 1 lb ground buffalo/bison meat
  • 1/2 tsp garlic powder
  • 1/2 tsp onion powder
  • Salt and Pepper to taste
  • 1 cup sweet yellow onion, sliced
  • 1 1/2 cup mushrooms, sliced
  • 1.5 tbsp butter
  • 1 head of Bibb lettuce
  • 8 bamboo skewers (optional but great for presentation!)

Directions: 

  1. Start by preparing the silder patties. Mix ground buffalo, garlic powder, onion powder, salt and pepper so that the meat is well seasoned. Form 8 patties, 2 oz each, ensuring they are an even thickness. Set aside at room temperature while you prepare the onions and mushrooms.
  2. Thinly slice onion and mushrooms. In a saucepan, melt butter over medium heat. Once melted, saute onions and mushrooms, about 5 minutes. Season with an additional bit of salt and pepper and remove from heat. 
  3. Separate 8 lettuce leaves in preparation for the assembly of the sliders. Set aside.
  4. Heat a cast iron skillet over medium high heat. Cook patties in skillet - these cook very quickly! Because these patties are so small, they should take about 2 minutes per side. 
  5. To assemble sliders, place a bison patty on one of the lettuce leaves, top with sautéed onions and mushrooms. You could simply serve like this OR you could get fancy like I did and fold the lettuce around the patty (like an envelope) and secure with a wooden skewer.  

Nutritional Information (1 slider)

130 calories - 12.5 g Protein, 3.2 g Carbohydrates, 7.6 g Fat

Posted on October 7, 2015 and filed under Recipes, Beef.

Baked Sweet Potato Chips

Baked Sweet Potato Chips | My Engineered Nutrition

Another healthy snack alternative comin' atcha! Ditch the store bought chips that are high in fat and artificial flavorings. Opt for these homemade sweet potato chips that are perfectly crispy, simple and delicious. 

I must stress that baked sweet potato chips work best with SWEET POTATOES, not YAMS. Sweet potatoes have a white interior and a pale brown skin. Very different from a yam, which has a bright orange interior. If you want to learn more about the difference in potatoes I suggest reading this article! What's the Difference Between Yams and Sweet Potatoes?

Baked Sweet Potato Chips | My Engineered Nutrition

If you ask me, the key to great chips is starting with thinly sliced sweet potatoes, all of which are uniformly cut. This ensures even baking. I can't stress how much easier a mandoline slicer makes your life with this step!

Baked Sweet Potato Chips | My Engineered Nutrition

Next, you need patience. You need to allow the chips ample baking time and you need to be diligent and watchful so that they do not burn! It is important to space the chips out on multiple baking sheets. If they are too close together they won't bake properly. Additionally, you will need to flip the chips one by one, halfway through their baking. 

Tedious? Yes. Worth it? Absolutely!

Baked Sweet Potato Chips | My Engineered Nutrition

Baked Sweet Potato Chips

Prep Time: 10-015 minutes

Cook Time: 20-25 minutes

Servings: 4

Ingredients:

  • 2 small/medium WHITE sweet potatoes, peels and sliced (14 oz)
  • 1/2 tbsp extra virgin olive oil
  • Salt to taste

Directions:

  1. Preheat oven to 400°F. Line multiple baking sheets with parchment paper. Prepare your potato chips by peeling your potatoes and then thinly slicing (about 1/8" thick) with a mandoline slicer or parring knife. Once both potatoes have been sliced, toss with olive oil and salt. 
  2. Evenly space chips out on parchment lined baking sheets. Bake for 12-15 minutes, or until bottom sides of chips begin to brown. Carefully flip each chip over and return to oven to continue baking for another 10 minutes. During this step it is important to keep a watchful eye on the chips. I remove individual chips if they have baked fully, allowing the remaining to continue baking. 
  3. Remove from oven and allow chips to cool - this also allows them to crisp up! Once cooled, enjoy!

Nutritional Information (1 serving)

110 calories - 2 g Protein, 21 g Carbohydrates, 2 g Fat

Posted on October 6, 2015 and filed under Recipes, Vegetables/Sides.