Posts filed under Recipes

Mango Lime Shrimp

Mango Lime Shrimp | My Engineered Nutrition

While the start to summer isn't technically for another month, Memorial Day always seems like the "unofficial start" to me. I'm also lucky enough to be heading to Mexico tomorrow morning (WOO!!)  so I'm definitely feeling the itch for summertime. This dish certainly gets me in the mood for some warm summer weather! 

Mango Lime Shrimp | My Engineered Nutrition

I love the bright contrasting colors of this dish. It is served chilled and is light and flavorful. It could be served up on its own, on top of a bed of lettuce or with some tortilla chips, eaten like a salsa. I think this would be a great dish to bring to a summer cook out or pool party. 

This is so incredibly simple to make. I love it because you can either make it the night before (which I recommend to really let the flavors intensify) or if you are in a time crunch it can be made in only 15 minutes! 

Mango Lime Shrimp | My Engineered Nutrition

You start by combining raw shrimp with a bit of coconut oil, lime juice and chili powder. While letting it sit to marinate, I chop up all the other ingredients - mango, red bell pepper, red onion and LOTS of cilantro! Throw the shrimp into a skillet over medium high heat to cook. This only takes 3-4 minutes so keep an eye on those shrimp. Continue to stir as they cook and once they are all pink remove from heat. 

Transfer shrimp from skillet to a large mixing bowl to cool, draining off the excess liquid. In a blender you combine remaining lime juice, cilantro, garlic cloves and salt to create the dressing for the salad. 

Mango Lime Shrimp | My Engineered Nutrition

Give the shrimp a quick chop to cut into bite sized pieces. Combine with mangos, peppers, red onion and cilantro-lime dressing. Give this a good mix and you are all finished! Easy as that! 

Mango Lime Shrimp | My Engineered Nutrition

Like I mentioned previously, the flavors are really best if you are able to chill in the refrigerator for a couple of hours before eating. Eat this by itself or if you have leftovers (like I did) you can get creative and make shrimp tacos! 

Mango Lime Shrimp | My Engineered Nutrition

Mango Lime Shrimp

Cook Time: 15 minutes

Servings: 4

Ingredients

  • 1 lb raw shrimp
  • 1 tbsp coconut oil, melted
  • 1/2 tsp chili powder
  • 3 limes, juiced (divided - 1 lime for shrimp, 2 limes for cilantro-lime dressing)
  • 1/4 cup red onion, chopped
  • 1 cup mango, chopped
  • 2/3 cup red bell pepper, chopped
  • 1 cup cilantro, loosely chopped
  • 2 garlic cloves
  • 1/2 tsp salt

Directions

  1. Mix shrimp with juice of 1 lime, melted coconut oil and chili powder. Set aside to marinate.
  2. Chop red onion, mango and red bell pepper while the shrimp is marinating. 
  3. Over medium high heat, cook shrimp in a skillet for 3-4 minutes. They will cook up very quickly so be sure to remove from heat once they have turned pink. Transfer to a bowl to cool, draining the liquid from the shrimp and discarding. 
  4. While the shrimp are cooling, in a blender combine the remaining juice of 2 limes, cilantro, garlic and salt. Blend until combine and the cilantro has been chopped. 
  5. Give the cooled shrimp a rough chop to cut into smaller pieces. Combine shrimp with mango, red bell pepper, red onion and mix. Pour cilantro-lime dressing over top and stir to combine. 
  6. Transfer mango shrimp to refrigerator to continue cooling and to allow flavors to intensify (recommended) or can be eaten immediately warm. 

Nutritional info (1 serving, approximately 1 cup)

187 Calories - 23.7 g Protein, 12.7 g Carbs, 4.6 g Fat


Enjoy!!
Posted on May 26, 2015 and filed under Recipes, Fish/Seafood.

Rosemary Pork Roast with Butternut Squash and Apples

Rosemary Pork Roast with Squash and Apples | My Engineered Nutrition

In many cities, the month of May brings rising temperatures and signs of summer. In San Francisco, however, May signifies the start of our "winter" - cold, biting temperatures and thick, rolling fog. A small price to pay for living in such an amazing city, I suppose. On nights when the wind is blowing and the temperature has dropped, nothing beats coming home to a warm dinner. 

Rosemary Pork Roast with Squash and Apples | My Engineered Nutrition

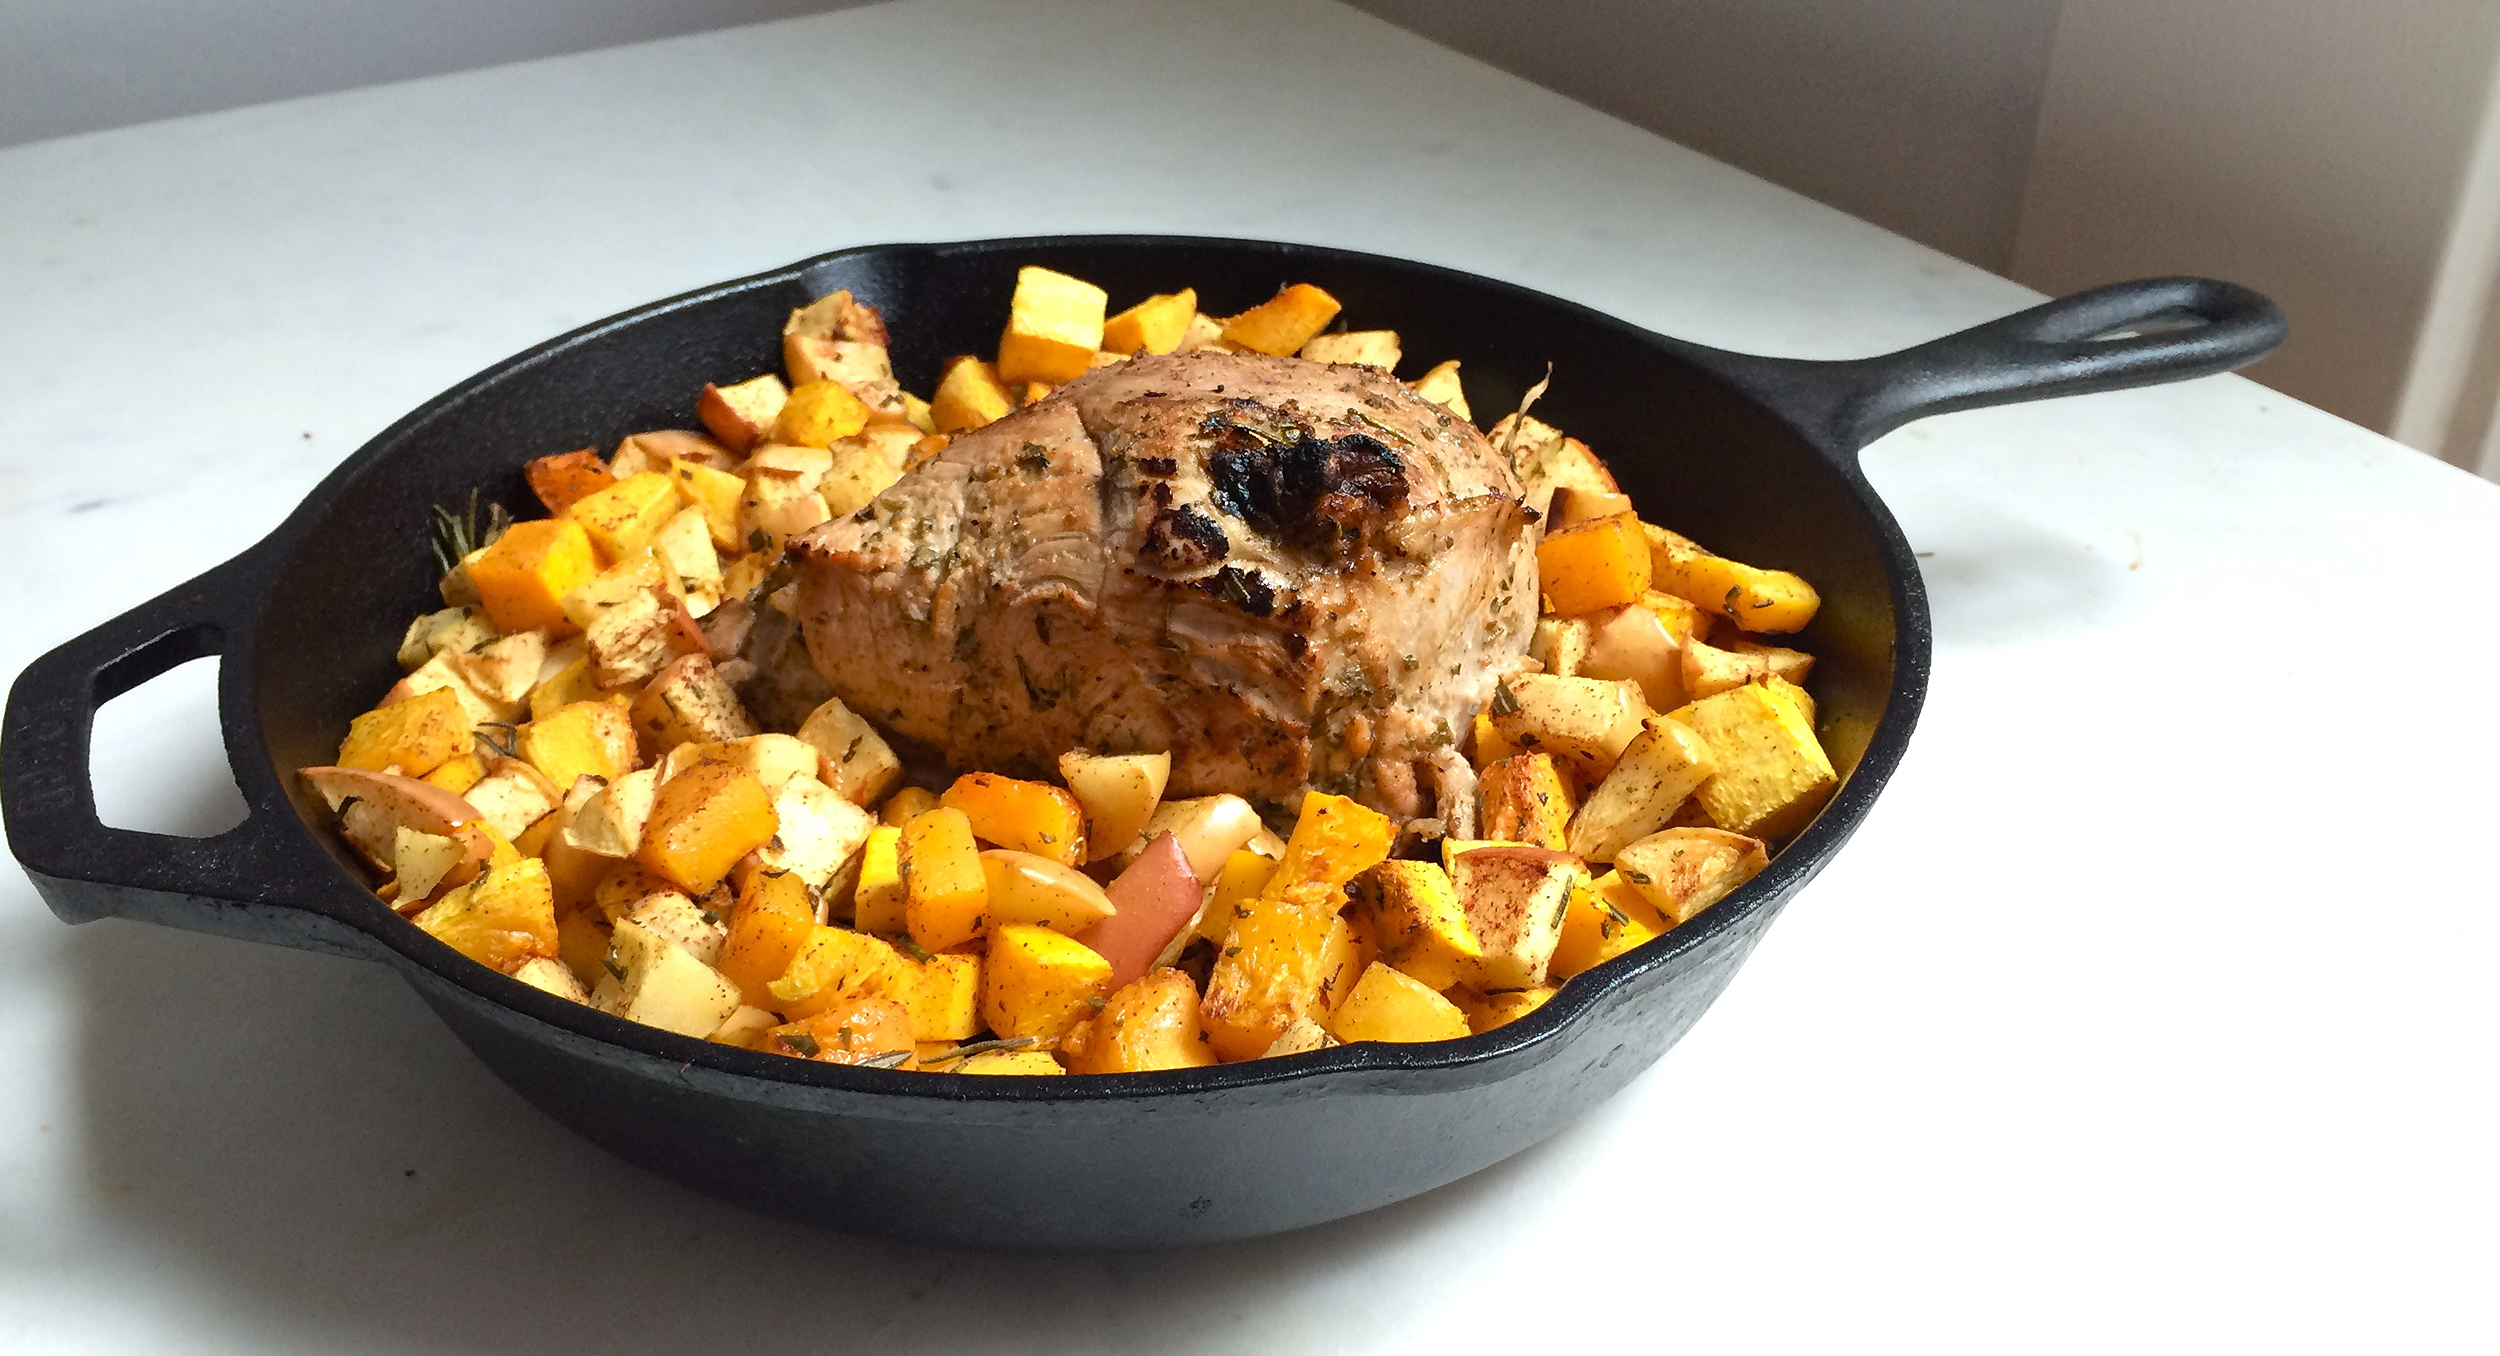
During the week, between work and workouts, I'm usually short on time. This meal is a perfect weeknight dinner option - seems like it took hours to make but can be completed within an hour! I love eating sirloin tip pork roasts. It's a very lean cut of pork but is still incredibly juicy. If you have an extra 30 minutes to spare, allowing it to marinate in my rosemary, lemony-Dijon marinade makes it even better.

Rosemary Pork Roast with Squash and Apples | My Engineered Nutrition

By searing the meat on all sides, you create a crust which locks in the juices while the roast finishes off in the oven. This also helps shorten the actual cooking time of the meat, once in the oven.

Rosemary Pork Roast with Squash and Apples | My Engineered Nutrition

I love this duo of butternut squash and apples with the pork. They are tossed in cinnamon, rosemary, olive oil and salt prior to roasting. Sweet and savory! I prefer to roast the squash and apples in the same pan as the pork so that the flavors of the roast infuse with them.

Rosemary Pork Roast with Squash and Apples | My Engineered Nutrition

Cooking time will vary based on the size of your roast and oven, but I was able to cook my roast in under 45 minutes - around 8-10 minutes for the searing and 35 minutes to finish off in the oven! This pork roast is one of my go-to meals during the week. No matter the season, you can't go wrong with these flavors!

Rosemary Pork Roast with Squash and Apples | My Engineered Nutrition

Rosemary Pork Roast with Butternut Squash and Apples

Prep Time: 15 minutes + time for marinade (30 minutes to 24 hours, optional)

Cook Time: 45 minutes

Servings: 4-6

Ingredients

For the pork roast

  • 1 1/2 - 2 lb. sirloin tip pork roast
  • 2 tsp fresh rosemary, chopped
  • Juice of 1/2 lemon (about 2 tsp)
  • 1 tbsp extra virgin olive oil
  • 2 tsp Dijon mustard
  • 2 cloves of garlic, minced
  • 1 tsp Kosher salt
  • 1/2 tsp cracked pepper

For the roasted squash and apples

  • 3 cups butternut squash, cubed
  • 2 apples, cubed
  • 2 tbsp fresh rosemary, chopped
  • 1 tbsp extra virgin olive oil
  • 1 tsp cinnamon
  • 1 tsp Kosher salt

Kitchen Tools

    Directions

    1. Start by making the marinade for the pork. In a small bowl combine rosemary, lemon juice, olive oil, Dijon mustard, garlic, salt and pepper. Whisk to combine and pour over pork. If you are short on time, you could skip letting this sit to marinate. If you have time, allow to marinate in the refrigerator for 30 minutes or up to 24 hours. (Even better, you could put the pork in the marinade the night before so that you are ready to go straight to cooking the next night!)
    2. Remove pork from the refrigerator and allow to come to room temperature. Preheat oven to 400°. 
    3. Chop squash and apples into cubes. Toss in rosemary, olive oil, cinnamon and salt.
    4. Heat cast iron skillet over high heat. Once heated, sear all sides of the roast for 2-3 minutes per side, creating a crust. 
    5. Arrange as much of the squash and apple mix in the skillet, around the roast, that will fit. Any remaining lay in a single layer on a baking sheet. Transfer cast iron skillet and baking sheet to oven. 
    6. Allow to cook until the roast registers an internal temperature of 140° (my roast of 1.6 lb. took 35 min - about 20 min per lb.). For the most accurate cooking time, I highly recommend the use of a meat thermometer! 
    7. Remove roast and squash/apple mix from oven and allow to sit for 5 min before cutting - we don't want to lose all the juices!
    8. Slice pork roast thinly and serve with roasted butternut squash and apples!

    Pork Nutritional info (1 serving, 5 oz cooked)

    189 Calories - 35 g Protein, 0 g Carbs, 5.6 g Fat

    Butternut Squash and Apples Nutritional info (1 serving = 1/4 of full recipe)

    135 Calories - 1.3 g Protein, 27.5 g Carbs, 3.8 g Fat


    Posted on May 18, 2015 and filed under Recipes, Pork.

    Plantain Protein Waffles with Mixed Berry Compote

    Plantain Protein Waffles | My Engineered Nutrition

    Waffles were made for lazy weekend mornings. Just because it's the weekend, however, doesn't mean your nutrition can go out the window! Traditional waffles are high in fat, heavy on the carbs and very low in protein. While my waffles aren't the real deal, they are a great alternative for a weekend treat! These waffles are dairy-free, grain-free and gluten-free as they contain NO flour! 

    Plantains | My Engineered Nutrition

    Not to be confused with a banana, plantains are a much starchier relative. While they may look sweet,they are nearly inedible unless cooked. Health benefits of plantains include:

    • High in fiber! 
    • More vitamin-A and vitamin-C than bananas
    • More potassium than bananas (37% more)

    Plantains range from unripe (green) to ripe (yellow) to very ripe (black). At their ripest they are very sweet and at their unripest, very starchy. In this recipe, I chose to use a yellow plantain that is starting to spot but not yet entirely black. It is important to use the correct type of plantain for this recipe! 

    In addition to the plantains, the other main ingredient of the waffles is protein powder. You can use any protein you want - I chose to use a plant-based vanilla vegan protein, but whey protein could work as well. 

    Mixed Berry Compote | My Engineered Nutrition

    You will need both a waffle maker and a blender for this recipe. 

    I highly recommend everyone own a good, sturdy blender. After going through many cheap blenders, I finally made the investment in this and love it! 

    I also love my waffle maker and believe this is a worthy investment. I recommend something similar to this model.

    Plantain Protein Waffles | My Engineered Nutrition

    These waffles are not overly sweet, but the mixed berry compote provides all the sweetness you need. 

    Whether you are fueling up for a workout or eating these in your pajamas, it's never a bad day when it starts off with light, healthy, protein-packed waffles! 

    Plantain Protein Waffles | My Engineered Nutrition

    Plantain Protein Waffles with Mixed Berry Compote

    Prep Time: 15 minutes

    Cook Time: 15 minutes (varies - cooked as directed by waffle maker instructions!)

    Makes 6 waffles and approx. 1 cup mixed berry compote (2 servings)

    Ingredients

    For the compote

    • 1 cup sliced strawberries
    • 1/2 cup halved blackberries
    • 2 tsp lemon juice
    • 2 tsp water
    • 1 tbsp coconut sugar

    For the waffles

    • 2 scoops protein powder (60 g) - I used vanilla plant-based protein, any type will work
    • 1 yellow, brown spotted plantain (130 g) - about 3/4 cup sliced
    • 1/2 cup unsweetened applesauce
    • 1 tbsp coconut oil, melted
    • 2 egg whites
    • 1 tsp vanilla
    • 1 tsp baking soda
    • 1 tsp baking powder
    • 1/4 tsp cinnamon
    • Pinch of salt
    • 1-2 tbsp cashew milk (or any non-dairy type) - should be added according to consistency of batter

    Directions

    Mixed Berry Compote

    1. Combine all compote ingredients together in a small saucepan over medium heat. Cook for 10 min, stirring occasionally. 
    2. Take off the stove and set aside once the fruit has cooked down and the liquid has reduced.

    Plantain Protein Waffles

    1. Turn on waffle iron to begin heating up. Note: If you don't have a waffle iron this could also be made as pancakes!
    2. In a blender (a single serve cup attachment works really well for this) combine the protein powder, sliced plantains, applesauce, coconut oil, and egg whites. Blend to combine.
    3. Next, add vanilla, baking soda, baking powder, cinnamon and salt. Depending on the consistency of the batter you may or may not need the cashew milk. The batter should be fairly thick, but not so thick it won't blend. Add milk accordingly.
    4. Blend until all ingredients are well combined. 
    5. Grease waffle iron and spoon about 1/4 cup of batter for each waffle onto hot iron. Cooking time per batch will vary based on your iron, but I cooked mine for roughly 5 min per batch. Continue until all batter is used, which should yield 6 waffles.
    6. Stack up desired number of waffles, top with compote and dust with powdered sugar (not required, but what are waffles without it?)

    Grab your coffee and dig in!

    Waffle Nutritional info (Based on 3 waffles, will vary based on protein powder used)

    306 Calories - 27 g Protein, 31.5 g Carbs, 9 g Fat

    Mixed Berry Compote Nutritional info (Based on half of compote)

    44 Calories - 1 g Protein, 17 g Carbs, 0 g Fat

    Posted on May 11, 2015 and filed under Recipes, Breakfast, Protein Powder, Baking.

    BBQ Chicken Pizza with Cauliflower Crust

    BBQ Chicken Cauliflower Pizza | My Engineered Nutrition

    My very first post. 

    Being the perfectionist that I am, I procrastinated for quite some time trying to think up what the BEST first post would be. Should it be basic? Main dish or side? Breakfast or dinner?  After much thought and debate, this recipe turned out to be completely unplanned. 

    Have you ever craved pizza and wanted not just a slice but a whole pizza? 

    BBQ Chicken Cauliflower Pizza | My Engineered Nutrition

    I know I'm not alone. 

    I'm here to tell you with this BBQ Chicken pizza, you can do just that! Before this, I had never attempted to make a cauliflower crust. I'll admit, I was a bit skeptical as to whether you could actually make a crust from cauliflower that acted like a real pizza crust. After a few attempts, I am very pleased with the final outcome of this crust. On top of being delicious, it is also low fat, low carb and gluten free! 

    The process of making the crust starts just like you would for making cauliflower rice, if you are familiar with that. You take it a step further once you have the rice by steaming the cauliflower and the squeezing all of the liquid out.

    The end result is a ball of cauliflower "flour" to which you add your egg white, cheese, spices, and coconut flour. I found the coconut flour to really hold this crust together. On my first attempt at making this, I still felt there was a bit too much moisture and needed a binder. The coconut flour seemed to do the trick! Once mixed, you flatten and  bake until golden brown.

    Tah-dah!

    Cauliflower Pizza Crust | My Engineered Nutrition

    I use the BBQ sauce to act as the tomato sauce. Then topping with fresh mozzarella, which is always the best choice.

    BBQ Chicken Cauliflower Pizza | My Engineered Nutrition

    Next comes the chicken with another drizzle of BBQ sauce and sliced red onion.

    BBQ Chicken Cauliflower Pizza | My Engineered Nutrition

    Pop that back into the oven to bake for another 10 minutes - we want the cheese to get good and melted. Once everything is nice and bubbly remove from the oven and top with fresh cilantro.

    BBQ Chicken Cauliflower Pizza | My Engineered Nutrition

    It is a good thing you can eat this whole pizza guilt free...you aren't going to want to share.

    BBQ Chicken Cauliflower Pizza | My Engineered Nutrition

    BBQ Chicken Pizza with Cauliflower Crust

    Prep Time: 20 minutes

    Cook Time: 20-25 minutes

    Ingredients

    For the cauliflower crust

    • 1small to medium head of cauliflower, yielding about 3.5 cups flowerets (350g)
    • 1/3 cup shredded fat-free or low-fat monterey jack cheese (1.5 oz)
    • 1 egg white
    • 1 tbsp coconut flour
    • 1 tsp italian seasoning (equal parts dried oregano, basil, thyme and rosemary)
    • 1/4 tsp salt

    For the pizza toppings

    • 2 tbsp BBQ Sauce (I used Stubb's Sweet Heat
    • 1.5 oz fresh mozzarella cheese
    • 1/2 cup cubed baked or grilled chicken breast (2.5 oz)
    • 1/4 cup sliced red onion
    • 1/4 cup chopped cilantro

    Directions

    First, start with the the cauliflower crust

    1. Preheat oven to 450°. 
    2. Chop cauliflower into small flowerets, discarding of leavings and stem. Place cauliflower into food processor and pulse until you get a "cauliflower rice" constancy.
    3. Transfer cauliflower to a microwave-safe dish and microwave on high for 3 minutes. This steams the cauliflower.
    4. Once cooked, transfer cauliflower again to a tea towel lined bowl. Allow to cool for at least 5 minutes. When cool enough to handle, gather up the towel and squeeze the cauliflower into a ball -- and continue to squeeze! I can't stress enough how important it is to squeeze ALL the liquid out of the cauliflower. You should have about 1/2 cup of liquid when you are done. The end result is a ball of cauliflower "flour".
    5. In a mixing bowl combine cauliflower, shredded monterey jack cheese, egg white, coconut flour, seasonings and salt. Mix with hands until ingredients are well incorporated.
    6. On a parchment lined baking sheet flatten out dough, shaping into a thin round disk, about 1/4" thick.
    7. Bake in a 450° oven for 10-15 minutes or until it begins to turn golden.

    Assemble the pizza

    1. Once baked, spread 1 tbsp of the BBQ sauce onto the crust. Reserve the remainder.
    2. Add the mozzarella cheese followed by the chicken. Drizzle remaining 1 tbsp of BBQ sauce over top. Add onion.
    3. Bake again in a 450° oven for 10 minutes or until cheese has melted and onions have cooked.
    4. Remove pizza from oven and finish off with a sprinkle of fresh cilantro.

    I hope you enjoy! 


    I'd love to hear what recipes you would like for me to create - please leave a comment!

    Posted on May 5, 2015 and filed under Recipes, Chicken.