Posts filed under Baking

Pumpkin Protein Waffles

Pumpkin Protein Waffles | My Engineered Nutrition

Where the heck did Summer go? I feel like I blinked and all of a sudden, it's October. Rather than dwell on the fact that this year is racing by, lets celebrate with all things pumpkin! 

Since moving to California, I really miss seeing the seasons change. We have no turning leaves or crisp Fall air (unless you can count fog?). We do, however, have plenty of pumpkins! It may be sunny and 70 outside, and I may still be spending my weekends out at the beach, but in my kitchen - it's full on FALL!

Pumpkin Protein Waffles | My Engineered Nutrition

I love using pumpkins in baked goods. Not only does it add flavor, it can also be a substitute for oil or butter in a recipe. Delicious fall flavors AND low fat? Yes, please!

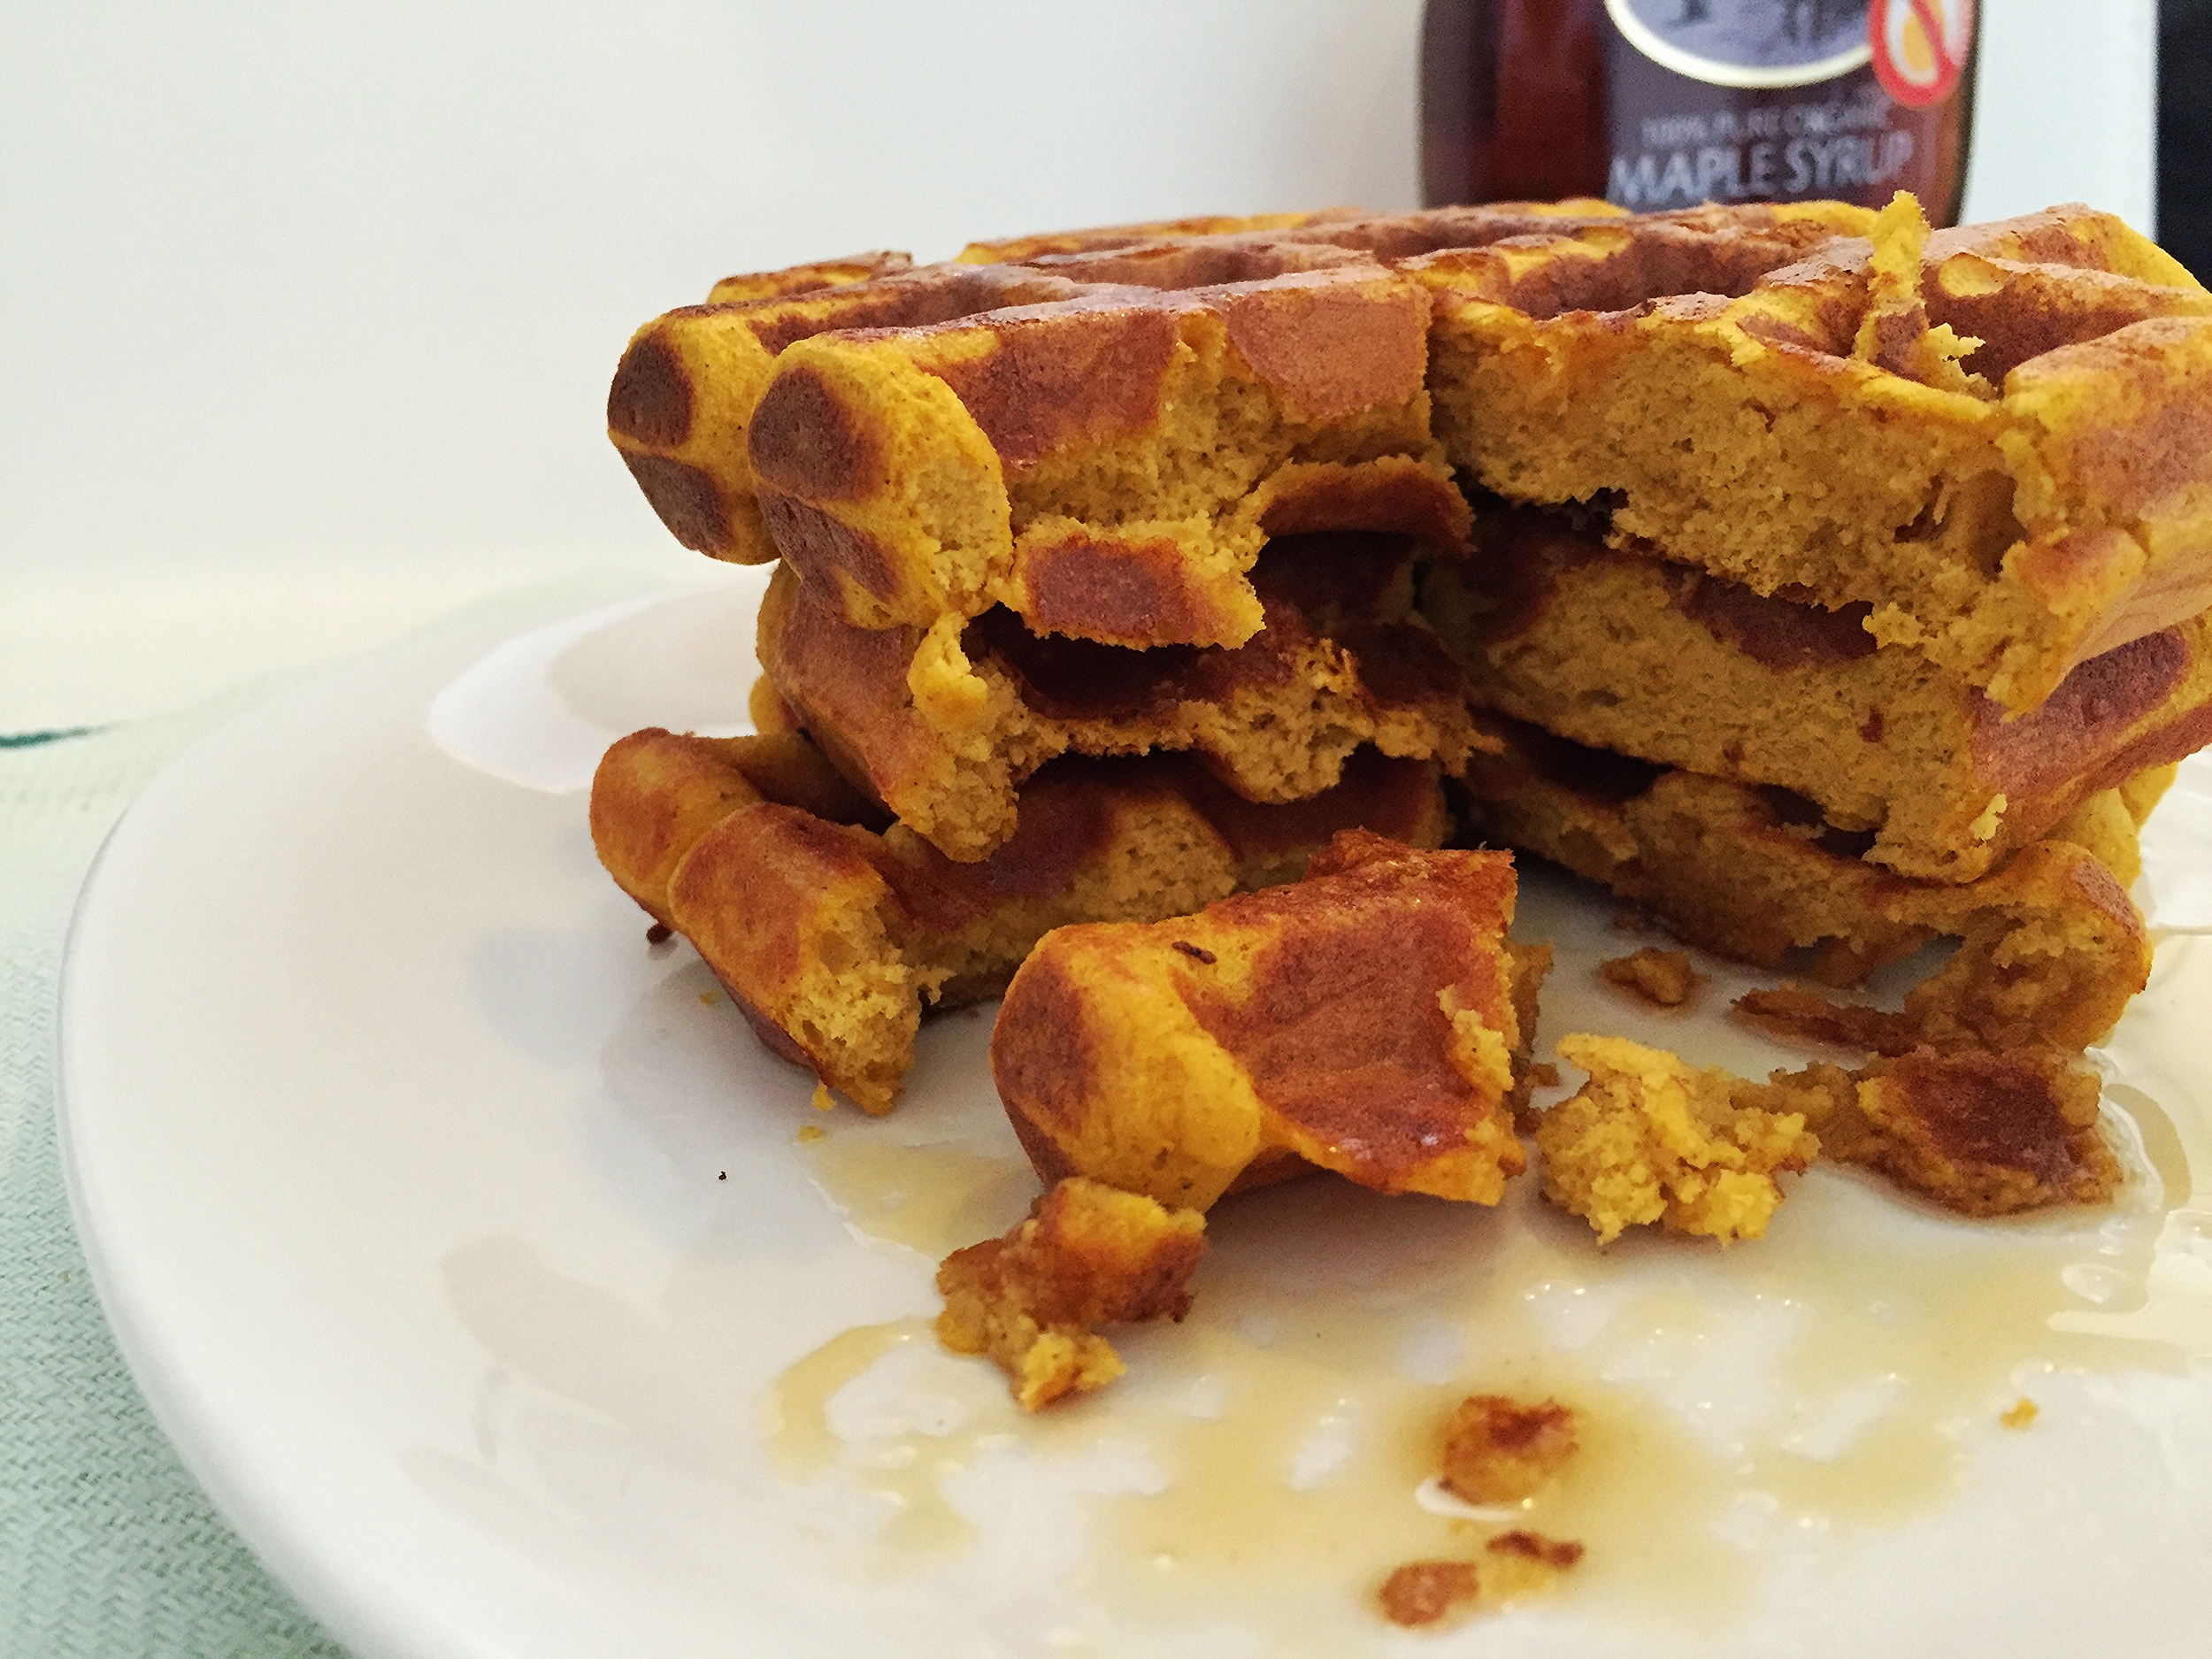
Waffles are one of those decadent, once in a blue moon special indulgent breakfast or brunch items. Normally, these are loaded with sugar and high in fat. If you are like me, you love waffles and want to be able to eat them whenever you damn well please. Enter: Protein Waffles. 

image.jpg

We have two secret substitutions in these waffles: protein powder (instead of flour) and pumpkin purée (instead of butter). These waffles SCREAM fall and are so easy to make its stupid. They are still crispy on the outside and soft and chewy in the inside. These are a perfect post-morning-workout treat. Each waffle packs 11 GRAMS of protein and less than 3 grams of fat!

Do yourself a favor and make a double batch of these waffles and freeze whatever you don't eat so that you can have these any day of the week!

Pumpkin Protein Waffles | My Engineered Nutrition

Pumpkin Protein Waffles

Prep Time: 5 minutes

Cook Time: 5-10 minutes

Servings: 6 waffles

Ingredients:

  • 2 scoops (1/2 cup) whey protein powder, vanilla 
  • 1/2 cup brown rice flour
  • 2 tsp baking powder
  • 1/2 tsp pumpkin pie spice
  • 1/4 tsp salt
  • 1 cup pumpkin puree
  • 2 eggs
  • 1 tsp vanilla extract
  • Optional topping: pure maple syrup

Directions:

  1. Preheat waffle iron according to manufacturer's directions.
  2. Combine all ingredients in a blender (except the syrup), incorporating into a batter.
  3. Ladle recommended amount of batter onto waffle iron. Close top and cook until waffle is golden brown and removes easily from waffle iron, about 2-4 minutes. Continue making waffles with remaining batter. Serve immediately. 

Nutritional Information (2 waffles):

250 calories - 22 g Protein, 30 g Carbohydrates, 4.7 g Fat


Posted on October 12, 2015 and filed under Recipes, Breakfast, Protein Powder, Baking.

Fig, Caramel and Goat Cheese Chocolate Cakes

Fig, Caramel and Goat Cheese Chocolate Cakes | My Engineered Nutrition

Once upon a time I was really into baking cupcakes.

OK, it was borderline obsessive. Almost every week I was creating a new pairing of flavors and would pawn these cupcakes off on my friends, family, coworkers...really anyone that was willing to eat a cupcake. I definitely had a reputation of being "the cupcake girl". However, this was a few years ago, before I really understood nutrition like I do now and the direct effect it had on my health and how I functioned. Once I started educating myself on proper nutrition and the importance of high quality of ingredients, my cupcakes comprised of all-purpose flour, refined sugar and artificial coloring were the first to go. While I love baking, I gave it a break for quite some time. 

While reorganizing my baking ingredients and accessories Saturday I suddenly had the urge to bake again. I was reminded that I had these fantastic vintage fluted baking molds that my mom sent me. I've had them for months (years?!) and never known what to do with them. They are traditionally used as brioche molds, but I immediately saw them as sophisticated cupcakes.

Fig, Caramel and Goat Cheese Chocolate Cakes | My Engineered Nutrition

I recently saw a cake on Pinterest that was garnished with FIGS, walnuts and caramel sauce. It is absolutely stunning - bad part is the website was in German and the cake (from the half translation I was able to manage with Google Translate) was not gluten free. 

Fig, Caramel and Goat Cheese Chocolate Cakes

That wasn't going to stop me.

The thing about baking is that you can't really "wing it" like you can cooking. You need to have the right ratios of ingredients - it is a science. I turned to one of my favorite chefs, Simone Miller, for the most amazing gluten free chocolate cake recipe. 

I stuck to what I knew I could create myself: frosting and caramel sauce. Once you've made one buttercream, you've made 100. It is so fundamentally simple and you can't really mess it up. Not sweet enough? Add more sweetener. Not thick enough? Add more butter. Simple. Caramel is also basic: sugar, butter, cream. 

Fig, Caramel and Goat Cheese Chocolate Cakes

These little beauties are topped with a goat cheese and mascarpone frosting, a drizzle of decadent caramel sauce and garnished with a fresh fig. Goat cheese and fig go together like peanut butter and jelly. Its a match made in heaven. Goat cheese and normally thought of as a savory flavor, but it brings an amazing element of character to this not-so-sweet buttercream. 

Fig, Caramel and Goat Cheese Chocolate Cakes | My Engineered Nutrition

Make no mistake - these aren't "healthy" to the point where you can go crazy and have 5 and call it dinner. However, there are certainly occasions that call for a special treat, and when those occasions arise you should always aim to use the highest quality of ingredients (i.e. ditch the heavily processed flour and artificial food coloring).

I hope you give these a try for your next special occasion...even if the occasion is simply surviving a week of work making it to the weekend!

Fig, Caramel and Goat Cheese Chocolate Cakes | My Engineered Nutrition

Fig, Caramel and Goat Cheese Chocolate Cakes

No Joke Dark Chocolate Cake

I used Zenbelly's No Joke Dark Chocolate Cake recipe for these cakes.  It is FANTASTIC. Not overly sweet but rich with chocolate flavor. I made the recipe she has in her cookbook which is scaled to a slightly larger batch. I was able to make 8 larger fluted cakes and 6 smaller, using the molds shown above. I would imagine this recipe will make 12 cupcakes. 

If you use the molds like I did (and recommend!) then make sure you grease these VERY liberally or else you won't be able to remove them. You should also  plan on leveling out the cakes once they have cooled and been removed from the molds. Slice any excess from the bottoms so that the cakes sit flat. 

Goat Cheese Frosting

Servings: 12

Ingredients:

Directions:

Combine mascarpone cheese and goat cheese in a large mixing. Using an electric hand mixer or standing mixer, beat on low for about 1 minute to cream the cheeses together. Add powdered sugar and beat on high for about 3 minutes until frosting begins to firm up and hold shape. Transfer into a pastry bag fitted with the decorating tip of your choice and frost the tops of the cakes. You can also simply transfer the frosting to a Ziploc bag and snip a small hole in one of the corners. 

Caramel Sauce

Yields roughly 1 cup of caramel sauce

Ingredients:

  • 4 tbsp grassfed butter
  • 3/4 cup coconut palm sugar (this a rich, unrefined sugar - in a pinch you could substitute light brown sugar but coconut palm sugar is recommended!)
  • 1/2 cup half & half
  • 1 tbsp pure vanilla extract

Directions:

Mix butter and sugar together in a small saucepan over medium heat until the sugar melts into the butter, about 1 minute. Increase heat to medium and slowly pour the half & half into the saucepan and bring mixture to a boil. Reduce heat to medium low and continue mixing intermittently, allowing sauce to thicken, about 5 minutes.  Add vanilla and cook for an additional minute to combine. Make sure you keep an eye on stirring this mixture as it cooks or else the butter may separate from the sauce and create a layer of oil on the top. 

Pull mixture from stove and allow to cool. Transfer to a glass jar and continue to cool mixture in the refrigerator. You won't use all of these caramel sauce on the cupcakes so you will have some leftovers - it tastes great drizzled into your coffee or over a scoop of coconut ice cream!

Assembly of cakes

Servings: 12

  • No Joke Chocolate Cakes 
  • Goat Cheese Frosting
  • Caramel Sauce
  • 6 fresh figs, quartered

Directions:

Top each cupcake with frosting. Next, drizzle caramel sauce over each cake. I transferred the sauce to a Ziploc sandwich bag and cut the smallest hole in the corner which worked great for drizzling. Lastly, garnish each cake with 2 cut pieces of fig.


Posted on September 9, 2015 and filed under Recipes, Sweet Treats, Baking.

Cherry Nectarine Crumble

Cherry Nectarine Crumble | My Engineered Nutrition

I have a serious love for stone fruits. Peaches, plums, nectarines, cherries, apricots - I don't discriminate. I make sure I take full advantage of them when they are in season (roughly June - August). Some how it is already August (WHEN did that happen?!) and our beloved stone fruits are coming to the end of their season. Before it is too late and we have to wait until next year, you MUST try this recipe for a Cherry Nectarine Crumble. 

Cherry Nectarine Crumble | My Engineered Nutrition

First things first, I highly recommend investing in a cherry pitter (pictured above) or else the pitting process will go much slower for your cherries. I can't imagine trying to pit nearly a pound of cherries without one of these bad boys. 

Since I am an advocate of purchasing whatever produce is most ripe and in season, I will say this recipe is by no means limited to just cherries and nectarines. In fact, I made this recipe a 2nd time and used almost all nectarines (I only had about a cup of cherries on hand at the time) and it came out just as delicious. Let's be honest, you could put this crumble topping on anything and I'm pretty sure it would turn out delectable. 

Cherry Nectarine Crumble | My Engineered Nutrition

This is recipe is truly a creation of my own. Every recipe I looked to for inspiration was either A) high in fat or B) not gluten free. This version offers hints of coconut flavor throughout, which I think adds a unique depth of flavor to this crumble! The light coconut milk helps in making this recipe lower in fat than traditional fruit crisps or crumbles yet also keeps it from becoming too dry. 

Cherry Nectarine Crumble | My Engineered Nutrition

Before you have to wait until next stone fruit season, head out and buy the most ripe fruit you can find and indulge in this low fat, gluten free, so good you'll want to eat the whole thing - crumble TONIGHT!

Cherry Nectarine Crumble

Prep Time: 15 minutes

Cook Time: 30 min 

Servings: 6 

Ingredients

Crumble Topping

  • 2/3 cup gluten free rolled oats (instant can work in a pinch)
    • NOTE: All pure oats are gluten free but read HERE for clarification on the issue
  • 1/3 cup coconut flour
  • 2 tbsp coconut palm sugar (or brown sugar could work here)
  • 1/2 tsp cinnamon
  • 1/4 tsp salt
  • 2 tbsp butter
  • 1/4 cup light coconut milk (could also use full fat but will not yield same nutritional info below)

Filling

  • 3 cups dark sweet cherries, pitted (amount yielded after pitting)
  • 1 1/2 cups nectarines, sliced (about 2 small nectarines)
  • 1 tbsp tapioca or arrowroot flour (could also use cornstarch)
  • 1 tbsp lemon juice
  • 2 tsp coconut palm sugar

Directions

  1. Preheat oven to 400⁰F. 
  2. Begin by preparing the fruit. A cherry pitter will save you LOADS of time in this step. Pit cherries and cut in half, placing them in a medium mixing bowl with sliced nectarines. Dust fruit with tapioca flour and palm sugar, followed by lemon juice. Mix to combine. Transfer fruit mixture to a baking dish and create an even layer. I used an 8" x 8" glass baking dish but you can use anything comparable you have on hand. Set aside. 
  3. Combine dry ingredients of crumble topping (oats, flour, sugar, cinnamon and salt) together in a small mixing bowl. Melt butter and combine with coconut milk. Mix wet ingredients into dry until a crumbly mixture forms and the butter/coconut milk is well incorporated. 
  4. Cover fruit mixture with crumble topping. Make sure you create an even layer over the entire surface of the fruit, you don't want to cheat someone on that crumble topping!
  5. Bake for 30 minutes, until the top begins to turn golden and the fruit begins to bubble up from below. I've been told that for others who have tried this recipe that 30 minutes wasn't quite enough time. Use your best judgement and you can always bake for an additional 5-10 minutes - just be watchful!
  6. Allow to cool for 10 minutes before cutting into the crumble (this is the hardest part!) to ensure it doesn't fall apart when you slice and serve. Serve warm on its own or add a dollop of whipped cream of ice cream! 

Nutritional info (1 serving)

184 Calories - 3.5 g Protein, 29 g Carbs, 6 g Fat

Posted on August 11, 2015 and filed under Recipes, Sweet Treats, Baking.

Plantain Protein Waffles with Mixed Berry Compote

Plantain Protein Waffles | My Engineered Nutrition

Waffles were made for lazy weekend mornings. Just because it's the weekend, however, doesn't mean your nutrition can go out the window! Traditional waffles are high in fat, heavy on the carbs and very low in protein. While my waffles aren't the real deal, they are a great alternative for a weekend treat! These waffles are dairy-free, grain-free and gluten-free as they contain NO flour! 

Plantains | My Engineered Nutrition

Not to be confused with a banana, plantains are a much starchier relative. While they may look sweet,they are nearly inedible unless cooked. Health benefits of plantains include:

  • High in fiber! 
  • More vitamin-A and vitamin-C than bananas
  • More potassium than bananas (37% more)

Plantains range from unripe (green) to ripe (yellow) to very ripe (black). At their ripest they are very sweet and at their unripest, very starchy. In this recipe, I chose to use a yellow plantain that is starting to spot but not yet entirely black. It is important to use the correct type of plantain for this recipe! 

In addition to the plantains, the other main ingredient of the waffles is protein powder. You can use any protein you want - I chose to use a plant-based vanilla vegan protein, but whey protein could work as well. 

Mixed Berry Compote | My Engineered Nutrition

You will need both a waffle maker and a blender for this recipe. 

I highly recommend everyone own a good, sturdy blender. After going through many cheap blenders, I finally made the investment in this and love it! 

I also love my waffle maker and believe this is a worthy investment. I recommend something similar to this model.

Plantain Protein Waffles | My Engineered Nutrition

These waffles are not overly sweet, but the mixed berry compote provides all the sweetness you need. 

Whether you are fueling up for a workout or eating these in your pajamas, it's never a bad day when it starts off with light, healthy, protein-packed waffles! 

Plantain Protein Waffles | My Engineered Nutrition

Plantain Protein Waffles with Mixed Berry Compote

Prep Time: 15 minutes

Cook Time: 15 minutes (varies - cooked as directed by waffle maker instructions!)

Makes 6 waffles and approx. 1 cup mixed berry compote (2 servings)

Ingredients

For the compote

  • 1 cup sliced strawberries
  • 1/2 cup halved blackberries
  • 2 tsp lemon juice
  • 2 tsp water
  • 1 tbsp coconut sugar

For the waffles

  • 2 scoops protein powder (60 g) - I used vanilla plant-based protein, any type will work
  • 1 yellow, brown spotted plantain (130 g) - about 3/4 cup sliced
  • 1/2 cup unsweetened applesauce
  • 1 tbsp coconut oil, melted
  • 2 egg whites
  • 1 tsp vanilla
  • 1 tsp baking soda
  • 1 tsp baking powder
  • 1/4 tsp cinnamon
  • Pinch of salt
  • 1-2 tbsp cashew milk (or any non-dairy type) - should be added according to consistency of batter

Directions

Mixed Berry Compote

  1. Combine all compote ingredients together in a small saucepan over medium heat. Cook for 10 min, stirring occasionally. 
  2. Take off the stove and set aside once the fruit has cooked down and the liquid has reduced.

Plantain Protein Waffles

  1. Turn on waffle iron to begin heating up. Note: If you don't have a waffle iron this could also be made as pancakes!
  2. In a blender (a single serve cup attachment works really well for this) combine the protein powder, sliced plantains, applesauce, coconut oil, and egg whites. Blend to combine.
  3. Next, add vanilla, baking soda, baking powder, cinnamon and salt. Depending on the consistency of the batter you may or may not need the cashew milk. The batter should be fairly thick, but not so thick it won't blend. Add milk accordingly.
  4. Blend until all ingredients are well combined. 
  5. Grease waffle iron and spoon about 1/4 cup of batter for each waffle onto hot iron. Cooking time per batch will vary based on your iron, but I cooked mine for roughly 5 min per batch. Continue until all batter is used, which should yield 6 waffles.
  6. Stack up desired number of waffles, top with compote and dust with powdered sugar (not required, but what are waffles without it?)

Grab your coffee and dig in!

Waffle Nutritional info (Based on 3 waffles, will vary based on protein powder used)

306 Calories - 27 g Protein, 31.5 g Carbs, 9 g Fat

Mixed Berry Compote Nutritional info (Based on half of compote)

44 Calories - 1 g Protein, 17 g Carbs, 0 g Fat

Posted on May 11, 2015 and filed under Recipes, Breakfast, Protein Powder, Baking.