Greek Lemon Chicken

Greek Lemon Chicken | My Engineered Nutrition

Looking for a simple, healthy and flavorful weeknight dinner? Yes? You've landed on the perfect recipe for just that!

If you are like me you are in need of a shake up from your usual baked chicken. Don't get me wrong, sometimes I crave really basic baked chicken, but most times I want loves of flavor.

Greek Lemon Chicken | My Engineered Nutrition

This dish really couldn't get any easier to make. The marinade is just FOUR ingredients. That's it. Combine those together and just add chicken. Letting this marinate overnight allows the flavors to really develop in the chicken. The result is incredibly moist and zesty lemon chicken. 

The kalamata olives are the perfect complement to the lemon and fresh oregano. To really tie things all together I recommend garnishing with a sprinkle of feta cheese. The perfect combination of Greek flavors, delivered in a quick and easy weeknight dinner!

Greek Lemon Chicken | My Engineered Nutrition

Greek Lemon Chicken

Prep Time: 10 minutes + Marinate Time (at least 30 min, up to 24 hrs) 

Bake Time: 30-40 minutes

Servings: 6

Ingredients: 

  • 4 small chicken breasts, roughly 36 oz total weight
  • 1-1/2 lemons, juiced
  • 1-1/2 tsp garlic, minced
  • 1 tbsp fresh oregano, finely chopped  
  • 1/2 tbsp extra virgin olive oil
  • Salt + Pepper
  • 10 kalamata olives, sliced in half
  • 1/2 lemon, thinly sliced into 4 rounds and then cut in half

Optional Garnish

  • Feta cheese
  • Fresh dill

Directions:

  1. In a mixing bowl or Ziploc bag combine lemon juice, garlic, oregano, extra virgin olive oil, salt and pepper. Stir to combine and add chicken breasts. Seal Ziploc bag or cover mixing bowl with plastic wrap and return to refrigerator to marinate. This can be done for as little as 30 minutes or can marinate overnight. The longer the marinating time, the better the flavor!
  2. Preheat oven to 375°F. Remove chicken from refrigerator and arrange breasts in a baking dish. Discard remaining marinade, we don't want a lot of excess liquid in the dish with the chicken while baking. Sprinkle olives on top of chicken and arrange lemon slices, 2 halves per chicken breast. 
  3. Bake at 375°F for 30-40 minutes, or until internal temperature reaches 155°F. I highly recommend investing in an instant read thermometer (like I explain here!) so that you never overcook your meats again.
  4. Once baked through, remove from oven and transfer to plates. Garnish with a sprinkle of feta cheese or fresh dill.

Nutritional Information (1 serving, roughly 5 oz cooked):

210 calories - 38g Protein, 1g Carbohydrates, 5.8g Fat


Posted on January 28, 2016 and filed under Recipes, Chicken.

Chocolate Cherry Protein Truffles

Chocolate Cherry Protein Truffles | My Engineered Nutrition

Every time I make and share a dessert with other, the question I always hear is "so, like...this is healthy and good for me to eat? Right?"  

No.

It doesn't work like that. I provide healthier alternatives to the original treats, but by no means is eating half of my Pumpkin Pie or a dozen Toffee Bars "healthy".  

These may be the exception.  

Chocolate Cherry Protein Truffles | My Engineered Nutrition

These Chocolate Protein Truffles are made from honest and simple ingredients - plant based protein, medjool dates, dried cherries, cocoa powder, cashew milk, vanilla extract and coconut oil.

That's it.

It's important to note this recipe calls for plant-based (vegan) protein - like rice or pea protein. This is critical as you won't get the same texture without it! Whey protein will not work in these truffles.

Chocolate Cherry Protein Truffles | My Engineered Nutrition

My motivation for creating these was my upcoming figure show. As I sneak closer and closer to the date, I'm slowing decreasing my food intake. These protein truffles satisfy my sweet tooth and actually give me a serving of protein while doing so! Before you go and think this is one of those "desserts" that really doesn't taste like dessert, I had these taste tested by 3 friends and all gave these the thumbs up, so cast your skepticism away.

Go ahead and make these Protein Truffles - they're good for your health! :D

Chocolate Cherry Protein Truffles | My Engineered Nutrition


Chocolate Cherry Protein Truffles

Prep Time: 25 minutes

Servings: 10 truffles

Ingredients:  

  • 3 scoops plant-based chocolate protein (I use True Nutrition Chocolate Brownie Plant-Based Protein)
  • 2 medjool dates, pitted
  • 1/4 cup dried cherries
  • 1/2 tsp vanilla extract
  • 1 tbsp cocoa powder
  • 3/4 cup cashew milk* (start with 1/2 cup and continue adding until the mix starts holding together)
  • 1/2 tbsp coconut oil

Optional: 

  • Cocoa powder for dusting or melted chocolate for a drizzle on top!

Directions: 

  1. Combine all ingredients in a food processor and pulse until well mixed. This will required you to use a spatula to scrape ingredients which stick to the side of the food processor bowl back into the mix. Continue pulsing and scraping until all ingredients are combined and the batter begins to form into a ball.   
  2. Like you would roll meatballs, form the "truffles" into balls by rolling a pinch of the mix between your hands. The mixture yields 10 truffles. Add any additional toppings you desire, like rolling in cocoa or drizzling melted chocolate!

Nutritional Information (1 truffle):

86 calories - 7.5 g Protein, 11 g Carbohydrates, 1.5 g Fat


Posted on January 21, 2016 and filed under Sweet Treats, Recipes, Protein Powder.

Egg Salad

Egg Salad | My Engineered Nutrition

Last week I sat down to think about what I'd like to create for 2016 recipes. This usually occurs when I'm hungry, so really it turns into me writing things down I'd love to eat...right then.

Topping that list was egg salad. 

Egg Salad | My Engineered Nutrition

Now, I can't tell you the last time I made egg salad, let alone the last time I ate it. All I know is that I got a hankering for it. Egg salad, in its classic form, is really quite simple to make: hardboiled eggs, mayo, Dijon, and celery. 

All that sounds great, except I don't really jump for joy over mayonnaise. I blame it on the fact that I worked at Panera in high school and was tasked with refilling the mayo container on the sandwich line from the MASSIVE tub we had in the back refrigerator. Blah. (As an aside, I love homemade/fresh aoli, which is the much more sophisticated version of mayo)

Egg Salad | My Engineered Nutrition

Given my adversion to mayonnaise, I knew I didn't want that in my salad. A much tastier and healthier 'creamy fat' is avocado! I swapped the mayonnaise for mashed avocado in this salad and I think you'll agree, it's an awesome substitute. I also omit half of the yolks from my hard boiled eggs to make this a slightly healthier option for overall fats. The rest of my flavor profile is rounded out with zesty lemon juice, crunchy celery, green onions and just a dash of Dijion. 

Simple yet flavorful, this is a great topping for a leafy green salad or filling for a sandwich. My personal favorite is a scoop served over a bed of arugula - the peppery greens give the eggs a nice kick!

No matter your preference on how to eat this, you're sure to enjoy my healthy twist on this delicious classic.  

Egg Salad | My Engineered Nutrition

Egg Salad

Prep Time: 10 minutes

Servings: 4 (1/2 cup each)

Ingredients:

  • 8 hardboiled eggs (yolks removed from half) - TheKitchn gives a great tutorial on hard boiling eggs
  • 1/4 cup avocado, mashed (2 oz) 
  • 2 tbsp lemon juice  
  • 2 tsp Dijion mustard
  • 1/4 cup celery, finely chopped
  • 1 tbsp scallions, whites and partial greens finely chopped (2 small scallions) 
  • Salt + Pepper to taste

Directions:

  1. Separate the egg whites from the yolks of 4 eggs. Roughly chop the hardboiled eggs and egg whites; transfer to mixing bowl. Add avocado, lemon juice, Dijon mustard, celery, scallions, salt and pepper. Mix until all is evenly mixed and creamy. Serve atop a bed of lettuce or on toasted bread as a sandwich! 

Nutritional Information (1/2 cup serving):

117 calories - 10 g Protein, 3.3 g Carbohydrates (1.3 g Fiber), 7.3 g Fat


Posted on January 14, 2016 and filed under Recipes, Chicken, Vegetables/Sides.

Spinach Artichoke Pizza with Cauliflower Crust

Spinach Artichoke Pizza | My Engineered Nutrition

Squeezing in one last recipe for 2015!

What a great year it has been. Even though I didn't start this website until May of 2015, I still managed to bring you 48 (yes, FORTY EIGHT) recipes this year. Oh man! Since I started off this blog with my BBQ Chicken Pizza with Cauliflower Crust, it seemed fitting to close out the year with another cauliflower crust pizza.  

Spinach Artichoke Pizza | My Engineered Nutrition

Recently, I figured out the sad truth that I'm allergic to nightshade vegetables. What is a nightshade? It is a plant family (Solanaceae) including tomatoes, peppers (bell pepper, chili peppers, tomatillos, cayenne, etc), white potatoes, eggplant and goji berries. The term “nightshade” may have been coined because some of these plants prefer to grow in shady areas, and some flower at night. 

I've narrowed it down that when I eat tomatoes and peppers (two of my most favorite things) my face begins to itch where my psoriasis is located and I begin to turn red. I'm not 100% sure this is what causes that, but there is a strong correlation and I don't want to chance it by continuing to eat them.

That being said, eating traditional pizza presents a dilemma. The base of most pizzas, after all, is tomato sauce.

Spinach Artichoke Pizza | My Engineered Nutrition

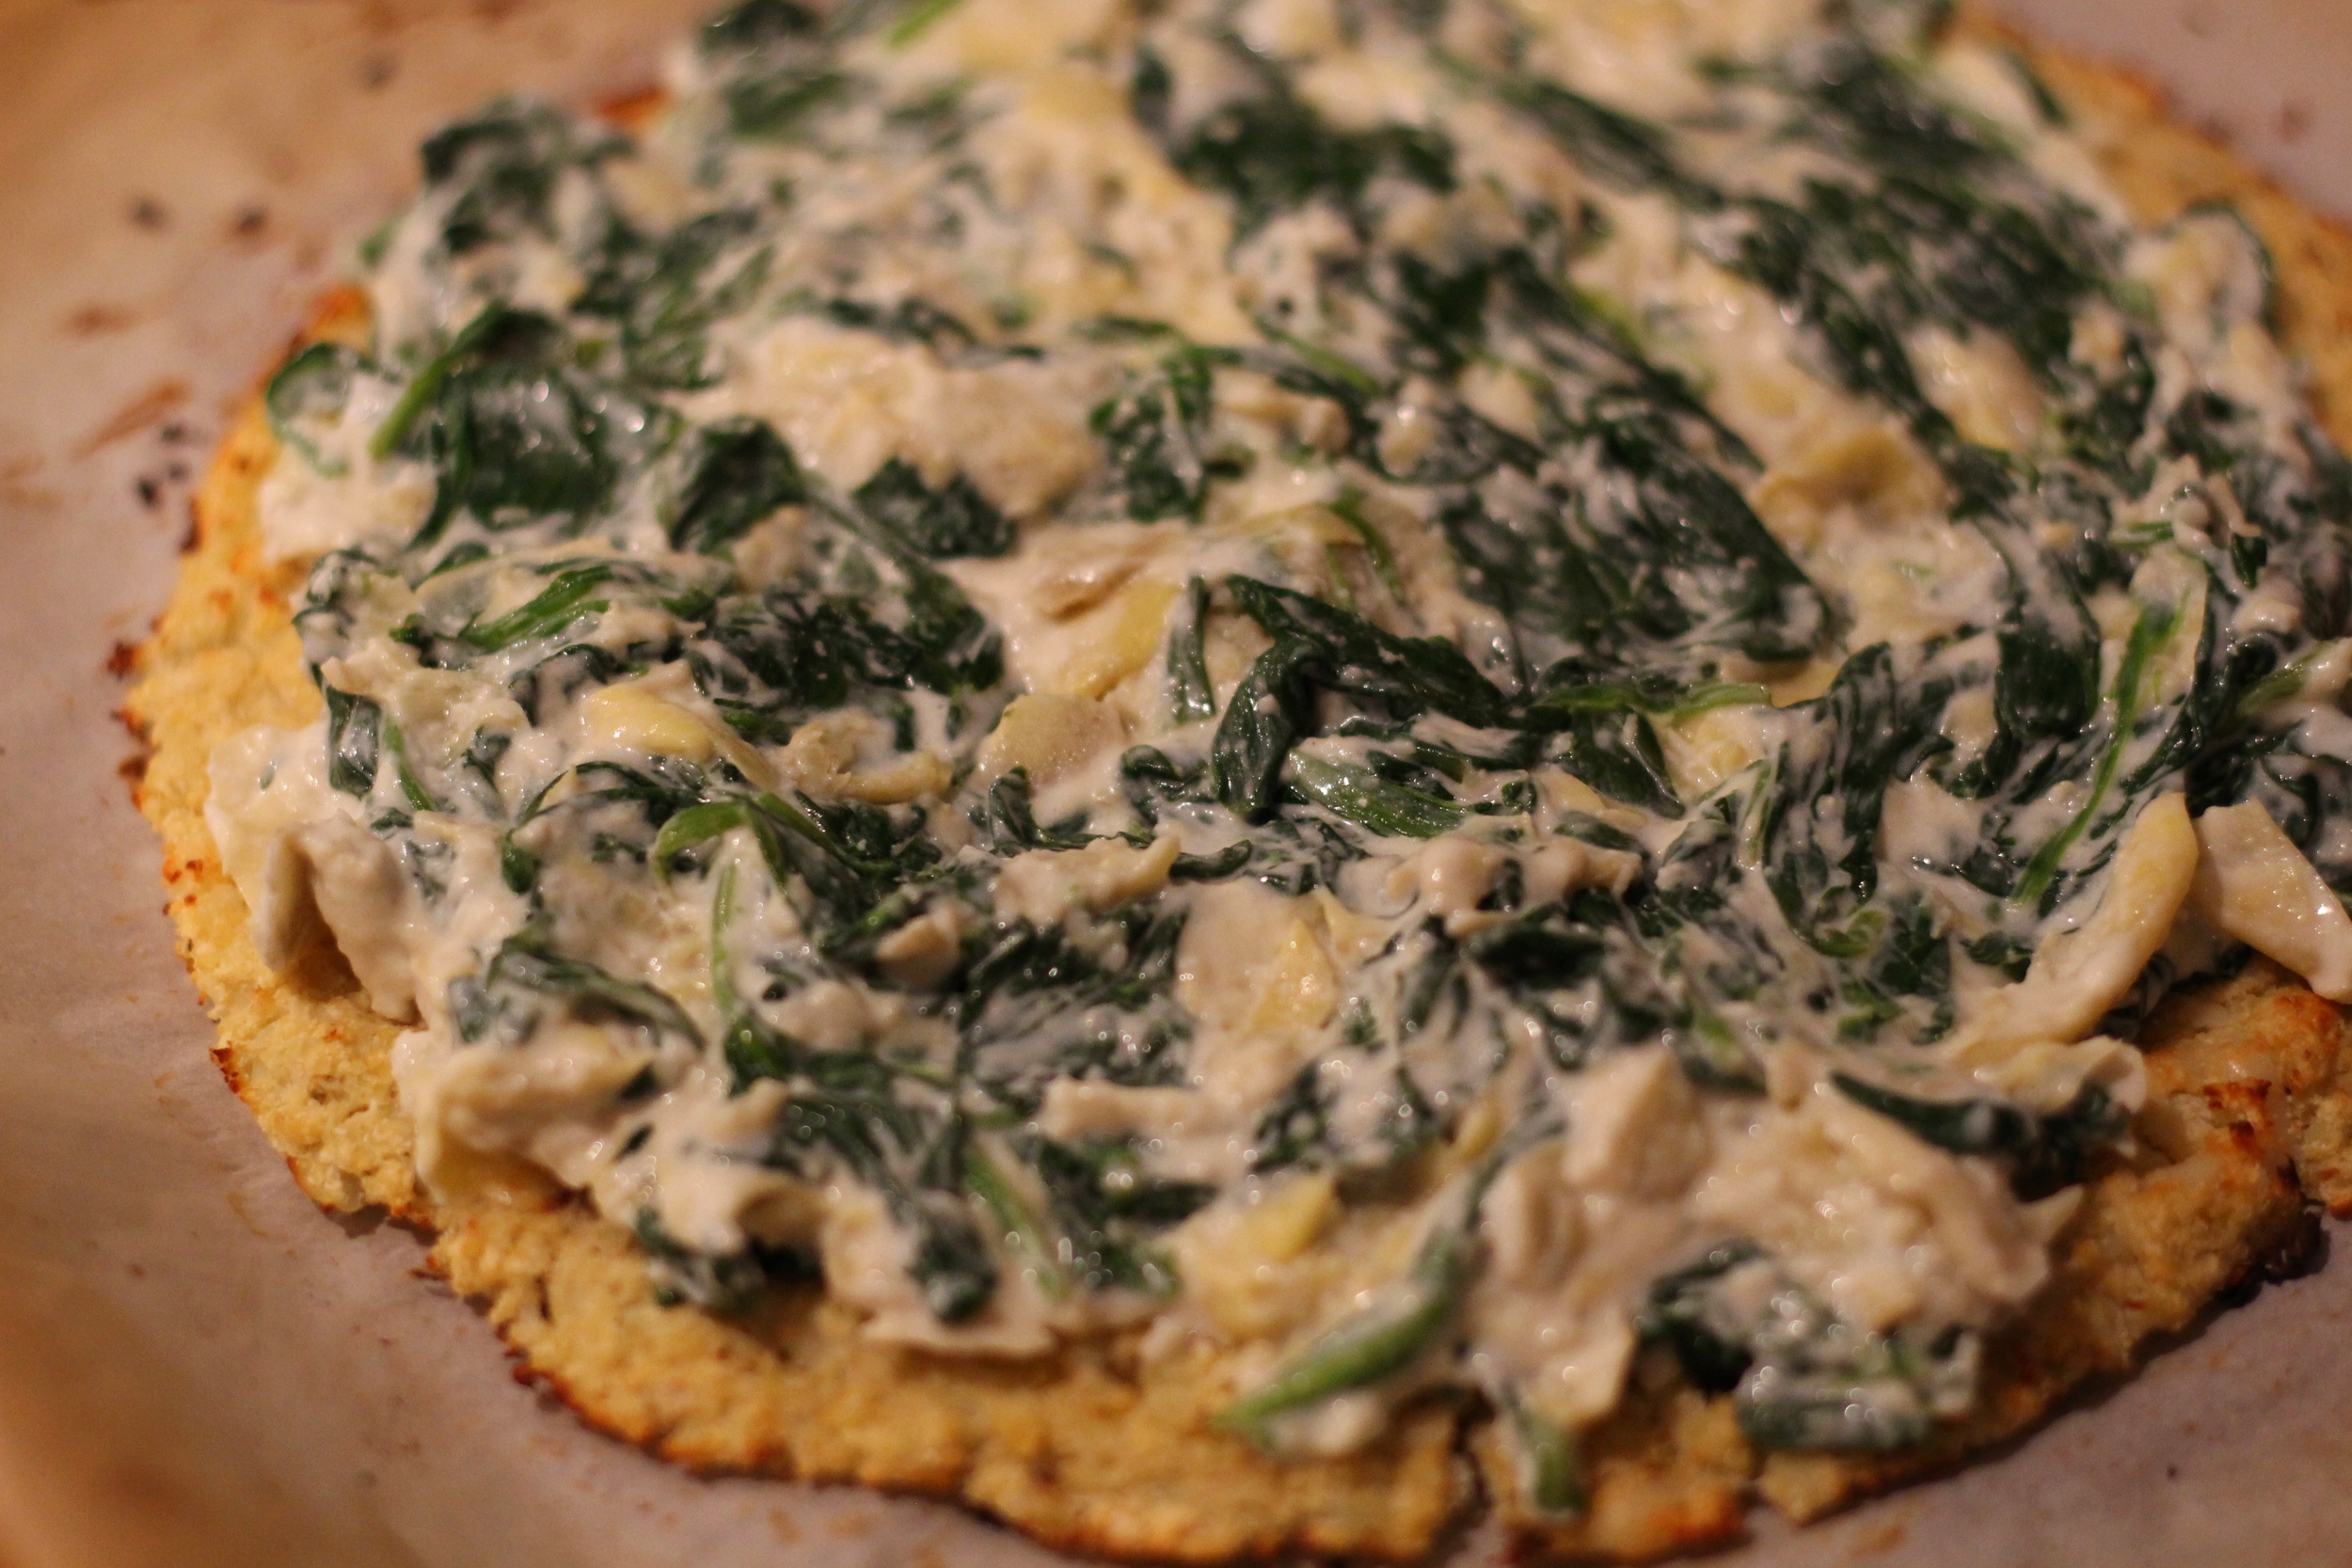
My mom recently saw a jar of Spinach Artichoke Pizza Sauce in Williams-Sonoma. I loved the idea of using that as the  base of my pizza! So yes - this isn't an original idea to use spinach and artichoke as the pizza sauce - gasp!

My mom always used to make (and still does) her spinach artichoke dip using canned artichokes, spinach, Miracle Whip and Kraft Parmesan Cheese. I tweaked this formula just a bit and made my spinach artichoke base using garlic, spinach, artichokes, nonfat Greek yogurt and freshly grated Parmesan cheese. Seriously, you could eat this stuff by the spoonful.

I spread that all over the top of my perfected Cauliflower Crust and finished things off with some turkey bacon and fresh mozzarella. The result is a super creamy pizza that tastes so decadent but is much better for you than eating traditional spinach artichoke dip, which can be loaded with fat. If you loved my BBQ Chicken Pizza then you must try this Spinach Artichoke Pizza today!

Spinach Artichoke Pizza | My Engineered Nutrition

Spinach Artichoke Pizza

Prep Time: 20 minutes

Cook Time: 15-25 minutes

Servings: 4 slices

Ingredients: 

  • 1 Cauliflower Crust  (see this post on how to make!)
  • 1/2 tbsp grass-fed butter
  • 3 cloves garlic, minced 
  • 5 oz baby spinach, roughly 4.5 cups or one small package of spinach
  • 1/2 cup artichokes hearts, chopped (75 g)
  • 1/2 tsp salt
  • 1/4 cup nonfat Greek yogurt (2 oz)
  • 1/4 cup shaved Parmesan cheese (1 oz)
  • 1.5 oz fresh mozzarella
  • 2 slices turkey bacon, cooked and chopped into small pieces

Directions:

  1. Preheat oven to 450°F. Prepare Cauliflower Crust per instructions, baking at 450°F for 10-15 minutes, until golden brown.
  2. While Cauliflower Crust is baking, melt butter in a nonstick skillet over medium high heat. Add garlic and brown for 1 minute. Next, add baby spinach and salt and allow to wilt, about 2-3 minutes. Once wilted add the artichoke hearts, stir to combine and cook for 1 minute to warm through. 
  3. Transfer spinach and artichokes to a mixing bowl, along with the Greek yogurt and Parmesan cheese. Mix until well incorporated.
  4. Once the Cauliflower Crust has finished baking, spread spinach artichoke mixture evenly over top the crust. Finish with a sprinkle of the turkey bacon and slices of fresh mozzarella. Bake at 450°F for 5-10 minutes, until cheese has melted. Remove from oven and allow to cool for 5 minutes before slicing. 

Nutritional Information (1 slice, 4 total slices in pizza):

163 calories - 16 g Protein, 9 g Carbohydrates (3.8 g Fiber), 7 g Fat

Posted on December 30, 2015 and filed under Recipes, Vegetables/Sides.

Mimi's Toffee Bars

Toffee Bars | My Engineered Nutrition

For my family and I, Christmas isn't complete without Mimi's Christmas cookies. We all know them and love them. Teatime Tessie's, Crescents, Acorns, and my personal favorite: Toffee Bars. Of course everyone also has their favorite cookie so we always had to make ALL the cookies...and lots of them!

Baking cookies was always a special time growing up as well - spending time with my Mimi, mom, aunts, cousins and sister in the kitchen. Our Mimi was the greatest woman ever and so many of my Christmas memories and traditions started with her. These cookies are very close to my heart <3

Toffee Bars | My Engineered Nutrition

The recipe for these cookies is from 1961, or so says the recipe that we have written down from Mimi. In 1961 things were a bit different with baking...yes, these cookies in their original form are not gluten-free (gasp!). I took a gamble and tweaked the recipe this year and I'm happy to report my successes! In addition to making these gluten-free, I also reduced the butter and cut out the refined sugar. 

Toffee Bars | My Engineered Nutrition

These cookies are really fun and easy to make. After baking the sheet of cookies you pile on chocolate pieces, allow them to melt on the warm from the oven cookie, and then spread that smooth chocolate all across. 


The final touch is a sprinkle of pecans. While the chocolate is still warm you will need to cut the cookies before allowing them to cool. You slice long strips (vertically) followed by cutting on the diagonal, making diamond shaped cookies. 

Toffee Bars | My Engineered Nutrition

These cookies have just the right amount of crispy crunch to them with a punch of dark chocolate and pecans. 

Happy Holidays! 

Toffee Bars | My Engineered Nutrition


Mimi's Toffee Bars

Prep Time: 10 minutes

Baking Time: 18-20 minutes

Servings: Approximately 40 cookies

Ingredients: 

  • 1/2 cup butter, softened
  • 1/2 cup 2% Greek yogurt
  • 1 cup coconut palm sugar
  • 1 tsp vanilla extract
  • 1 egg
  • 1 cup + 1 tbsp Gluten Free 1-to-1 Baking Flour
  • Dash of salt
  • 6 oz dark chocolate (around 62% cacao - not too dark like 90% or else it could be too bitter)
  • 1/2 cup chopped pecans

Kitchen Utensils:

  • Stand mixer or hand mixer
  • Cookie sheet with sides (10x15 in)

Directions:

  1. Preheat oven to 350F. 
  2. In the bowl of a stand mixer (or in a mixing bowl) combine the butter, Greek yogurt, sugar, vanilla, egg, baking flour and salt. Mix on medium high until well incorporated. Spread into un-greased cookie sheet, ensuring the cookie batter is smooth and level within the sheet. 
  3. Bake until the cookie rises and falls, resulting in a smooth cookie all the way across. This takes approximately 18-20 minutes - be sure to watch your edges! You don't want your cookie to burn. While the cookie is baking break your chocolate bars into small pieces and chop the pecans.
  4. Once the cookie has finished baking, remove from oven and lay chocolate over the top, spacing evenly and covering the cookie. Allow to sit for a minute or two before spreading the chocolate evenly across the top. Sprinkle with pecans. While the cookie is still warm cut straight long strips vertically (about 5 or 6 strips) followed by cuts on the diagonal, making diamond shaped cookies. 
  5. Allow the cookie to continue cooling before removing from the pan. This will take a few hours. I suggest making these the day before you plan on eating them and allowing them to cool overnight (or bake in the morning if you plan on serving that evening). You want to allow the chocolate to set and harden before enjoying!

Nutritional Information (1 cookie, based on approximately 40 total cookies)

85 calories - 1 g protein, 9.4 g carbohydrates, 4.8 g fat


Posted on December 23, 2015 and filed under Recipes, Sweet Treats, Baking.