Posts filed under Vegetables/Sides

Ham, Leek & Sourdough Dressing

Ham, Leek & Sourdough Dressing | My Engineered Nutrition

The holiday season is so close I can taste it. Literally. I have already starting practicing my dishes for the holidays!!

From now until Christmas, I’ll be sharing with you my family favorites – all with my twist to make them easier on the diet this season. Going through contest prep during the holidays is no easy task. I’m starting to realize more and more how disciplined I must be to make sure I stay on course. Nothing I can’t handle, however!

First up for my holiday favorites and just in time for Thanksgiving: Dressing. Or stuffing…the great debate.

IMG_0333.JPG

The main reason I love the holidays is that each family has their own traditions. Mine, for example, calls that deliciously bready side dish served with turkey DRESSING, not stuffing. Why? Because stuffing is stuffed and cooked in the bird while dressing is cooked in a casserole outside of the turkey. Perfectly logical if you ask me. Whatever your family calls it, dressing or stuffing, there are hundreds of variations.

Because dressing is one of my favorite side dishes, I wanted to create a recipe I would have no problem eating this Thanksgiving while staying in line with my contest prep. Traditionally, dressing (or stuffing) is made with sausage. As tasty as it may be, it is extremely high in fat. I opted for ham – same animal, leaner cut of meat! 

I also recently found my new favorite gluten free bread: Bread SRSLY. This stuff is AMAZING. Gluten free breads usually tastes like gluten free breads. Not this. No, this actually tastes like an amazing slice of sourdough. Instead of relying on the bread to be the bulk of the dressing (like normal) I cut back significantly on the bread and loaded up on other vegetables and the ham.

With sourdough and ham being the foundation of the dressing, now comes the other fillers. A must-have in my family’s dressing are water chestnuts. They add the perfect crunch! I used leeks instead of onions as I feel they bring a greater depth of flavor to the dish. Celery, fresh cranberries, rosemary and thyme round things out.  Not only is this dish full of flavor, it is also beautiful and full of color!

Ham, Leek & Sourdough Dressing | My Engineered Nutrition

Ham, Leek and Sourdough Dressing

Prep Time: 25 minutes

Cook Time: 50 minutes

Servings: 6

Ingredients:

  • 1/2 lb. Gluten-free sourdough bread (or whichever you prefer - I recommend Bread SRSLY), cubed (about ½"), yields 4 cups
  • 1 lb. country ham steak, cubed (about ½")
  • 1-1/2 tbsp. butter
  • 4 cloves garlic, minced
  • 2 medium leeks, bulb and lower leaf portion, 2 cups thinly sliced and halved
  • 2 cups celery, sliced
  • 1 tbsp. fresh rosemary, finely chopped
  • 1 tbsp. fresh thyme, finely chopped
  • 1 tsp. salt
  • 1/4 tsp. pepper
  • 1 can water chestnuts (5 oz. can)
  • 1-1/2 cup fresh cranberries
  • 1 cup chicken stock (see note 5 below)

Directions:

  1. Preheat oven to 350°F. Slice bread into ½" cubes, yielding about 4 cups of bread. Spread out evenly on a baking sheet and bake in oven for 10 minutes or until toasted.
  2. While bread is toasting, prepare the ham, leeks and celery. Slice the ham into ½" cubes like you did the bread. Slice the celery and leeks, setting aside. Remove bread from oven after it has toasted and set aside. Increase temperature to 375°F.
  3. In a large cast iron pot (or soup pot) sauté ham over medium heat for about 5 minutes, until the outside starts to brown and caramelize. Remove and set aside.
  4. Melt butter over medium heat. Add garlic, celery, leeks, herbs, salt and pepper. Sauté for about 5 minutes or until leeks soften and become slightly translucent. (This part smells SO flavorful!!). Turn stovetop heat off.
  5. Add drained water chestnuts, cranberries and ham back to the pot with the vegetables. Stir to mix evenly. Add 1/2 cup of the chicken stock, stir to incorporate, and then add the bread. If all liquid has soaked up, add remaining 1/2 cup of chicken stock. We don't want our mixture to become too wet - if liquid starts to pool at the bottom of the pot we've added too much! We want the mixture to be saturated but not swimming!
  6. Transfer to a casserole or baking dish. Cover dish with tin foil and bake at 375°F for 20 minutes covered. Remove tin foil after 20 minutes and continue baking for another 30 minutes uncovered. Let rest for 10 minutes before serving.
 

Posted on November 11, 2015 and filed under Recipes, Vegetables/Sides, Pork.

Baked Sweet Potato Chips

Baked Sweet Potato Chips | My Engineered Nutrition

Another healthy snack alternative comin' atcha! Ditch the store bought chips that are high in fat and artificial flavorings. Opt for these homemade sweet potato chips that are perfectly crispy, simple and delicious. 

I must stress that baked sweet potato chips work best with SWEET POTATOES, not YAMS. Sweet potatoes have a white interior and a pale brown skin. Very different from a yam, which has a bright orange interior. If you want to learn more about the difference in potatoes I suggest reading this article! What's the Difference Between Yams and Sweet Potatoes?

Baked Sweet Potato Chips | My Engineered Nutrition

If you ask me, the key to great chips is starting with thinly sliced sweet potatoes, all of which are uniformly cut. This ensures even baking. I can't stress how much easier a mandoline slicer makes your life with this step!

Baked Sweet Potato Chips | My Engineered Nutrition

Next, you need patience. You need to allow the chips ample baking time and you need to be diligent and watchful so that they do not burn! It is important to space the chips out on multiple baking sheets. If they are too close together they won't bake properly. Additionally, you will need to flip the chips one by one, halfway through their baking. 

Tedious? Yes. Worth it? Absolutely!

Baked Sweet Potato Chips | My Engineered Nutrition

Baked Sweet Potato Chips

Prep Time: 10-015 minutes

Cook Time: 20-25 minutes

Servings: 4

Ingredients:

  • 2 small/medium WHITE sweet potatoes, peels and sliced (14 oz)
  • 1/2 tbsp extra virgin olive oil
  • Salt to taste

Directions:

  1. Preheat oven to 400°F. Line multiple baking sheets with parchment paper. Prepare your potato chips by peeling your potatoes and then thinly slicing (about 1/8" thick) with a mandoline slicer or parring knife. Once both potatoes have been sliced, toss with olive oil and salt. 
  2. Evenly space chips out on parchment lined baking sheets. Bake for 12-15 minutes, or until bottom sides of chips begin to brown. Carefully flip each chip over and return to oven to continue baking for another 10 minutes. During this step it is important to keep a watchful eye on the chips. I remove individual chips if they have baked fully, allowing the remaining to continue baking. 
  3. Remove from oven and allow chips to cool - this also allows them to crisp up! Once cooled, enjoy!

Nutritional Information (1 serving)

110 calories - 2 g Protein, 21 g Carbohydrates, 2 g Fat

Posted on October 6, 2015 and filed under Recipes, Vegetables/Sides.

Brussels Sprout Chips

Brussels Sprout Chips | My Engineered Nutrition

Why are chips so addicting? Why is it that you can never just have one?

It's the salty, crunchiness of the chip that makes them just so damn tasty and addictive. 

Brussels Sprout Chips | My Engineered Nutrition

With a little extra effort, these brussels sprout chips provide a guilt-free alternative to the not-so-good-for-you bagged chips you find  in the grocery store and at nearly every party. For the longest time I never attempted making brussels sprout chips because...well, they seemed like more effort than what they were worth. 

Boy, was I wrong. 

I PROMISE that these are so worth it. So much so that you won't want to share. But, I urge you to share (maybe the second batch) at your next party! These would be a perfect snack to nibble on while watching football this fall or as a great snack for a cocktail hour with friends. 

Brussels Sprout Chips | My Engineered Nutrition

Brussels Sprout Chips

Prep Time: 15 minutes

Cook Time: 15 minutes

Servings: 2

Note: This recipe is EASILY scaled, just keep the ratio of 3 cups brussel sprout leaves to 1/2 tbsp extra virgin olive oil

Ingredients:

  • 3 cups brussels sprout leaves, yielded after separating
  • 1/2 tbsp extra virgin olive oil
  • 1/2 tsp salt
  • 1/2 tsp garlic powder

Directions:

  1. Preheat oven to 350°F. Line a baking sheet with parchment paper and set aside. 
  2. To separate leaves, but bottoms of brussel sprout off and discard. Carefully separate the outer leaves from the sprout until you are just left with the sprout core. Transfer the leaves into a mixing bowl. You can keep the sprout core for a different use - I usually slice in half and roast separately like normally done with brussels sprouts. Continue to separate the sprout leaves until you have 3 cups of leaves. Toss brussels sprout leaves with olive oil, salt and garlic power.
  3. Spread brussels sprout leaves in a single layer on the parchment lined baking sheet and bake for about 15 minutes, or until leaves become golden brown. Remove from oven and serve immediately. 

Nutritional Information (1 serving)

52 calories - 1.4 g Protein, 3.6 g Carbohydrates, 3.6 g Fat

Posted on October 6, 2015 and filed under Recipes, Vegetables/Sides.

Bacon Roasted Brussels Sprouts

Bacon Roasted Brussels Sprouts | My Engineered Nutrition

Fall is in full swing! My favorite seasons for cooking? Fall and winter. I love roasting and warm, slow cooked meals. I love the rich flavors and fragrant spices that fill your house as you are cooking. Halloween, Thanksgiving and Christmas. Cliche as it may be, I LOVE fall.

One of my ultimate Fall favorite side dishes? Bacon Roasted Brussels Sprouts. 

Bacon Roasted Brussels Sprouts | My Engineered Nutrition

Now, this certainly isn't a dish you can only eat in the fall and winter months, but it sure does hit the spot on evenings when the air is cool and crisp. This is a quick and simple side dish and honestly, what can be better than Brussels sprouts and bacon?  

Bacon Roasted Brussels Sprouts | My Engineered Nutrition

Bacon Roasted Brussels Sprouts  

Prep Time: 10 minutes

Cook Time: 20-25 minutes

Servings: 4

Ingredients

  • 4 cups Brussels sprouts
  • 3 slices of bacon
  • 1 tbsp shallots, minced  
  • 1 tsp fresh thyme, minced   
  • 1/4 tsp salt
  • 1/4 tsp pepper

Directions

  1. Preheat oven to 400°F. Prepare Brussels sprouts by cutting off their bottoms (discard) and slicing in half. For the extra large sprouts I usually cut these into quarters to assure they cook evenly. Transfer cut sprouts to large mixing bowl. Toss with shallots, thyme, salt and pepper.
  2. In a large skillet, fry bacon until crispy. I've found the best way to do this (without burning your bacon) is to begin by arranging your bacon in the skillet prior to turning on heat. Place skillet over medium-high heat and cook bacon until crispy, ensuring to flip bacon halfway through. This should take about 5 minutes.
  3. Once your bacon has cooked, removed slices and place on a paper towel lined plate. Set aside. Next, CAREFULLY pour rendered bacon grease over sprouts and toss to evenly coat.  
  4. Transfer sprouts to a baking sheet, spreading them out into a single even layer. Roast in 400°F oven for 20 minutes or until nicely browned. Halfway through roasting, give the sprouts a toss on the baking sheet so that you have even browning on all sides.  
  5. While roasting, chop the bacon into small pieces - real deal bacon bits! Once sprouts have roasted, sprinkle bacon on top and serve. 

Nutritional Information (1 serving)

130 calories - 5 g Protein, 8 g Carbs, 8.7 g Fat, 3.3 g Fiber

Posted on September 24, 2015 and filed under Recipes, Vegetables/Sides.

Cauliflower Crust

Cauliflower Crust | My Engineered Nutrition

I've shared my recipe for Cauliflower Crust previously in my post for BBQ Chicken Pizza. However, it is so versatile and so fantastic I felt it deserved a page all on its own. The process of making a cauliflower crust may sound imtimidating, and sure, it requires a bit more effort in making BUT, once you understand the steps it can be very easy!

The process of making the crust starts just like you would for making cauliflower rice, if you are familiar with that. Loosely chop 1 head of cauliflower and pulse it in a food processor until a "rice" consistency is reached.

Cauliflower Crust | My Engineered Nutrition

You take it a step further once you have the rice by steaming the cauliflower and the squeezing all of the liquid out. This is a critical step in making a crust that keeps shape once it has been baked. You can steam the cauliflower rice in the microwave (quickest method) or by baking it in the oven, spread out in a single layer on a baking sheet. 

Cauliflower Crust | My Engineered Nutrition

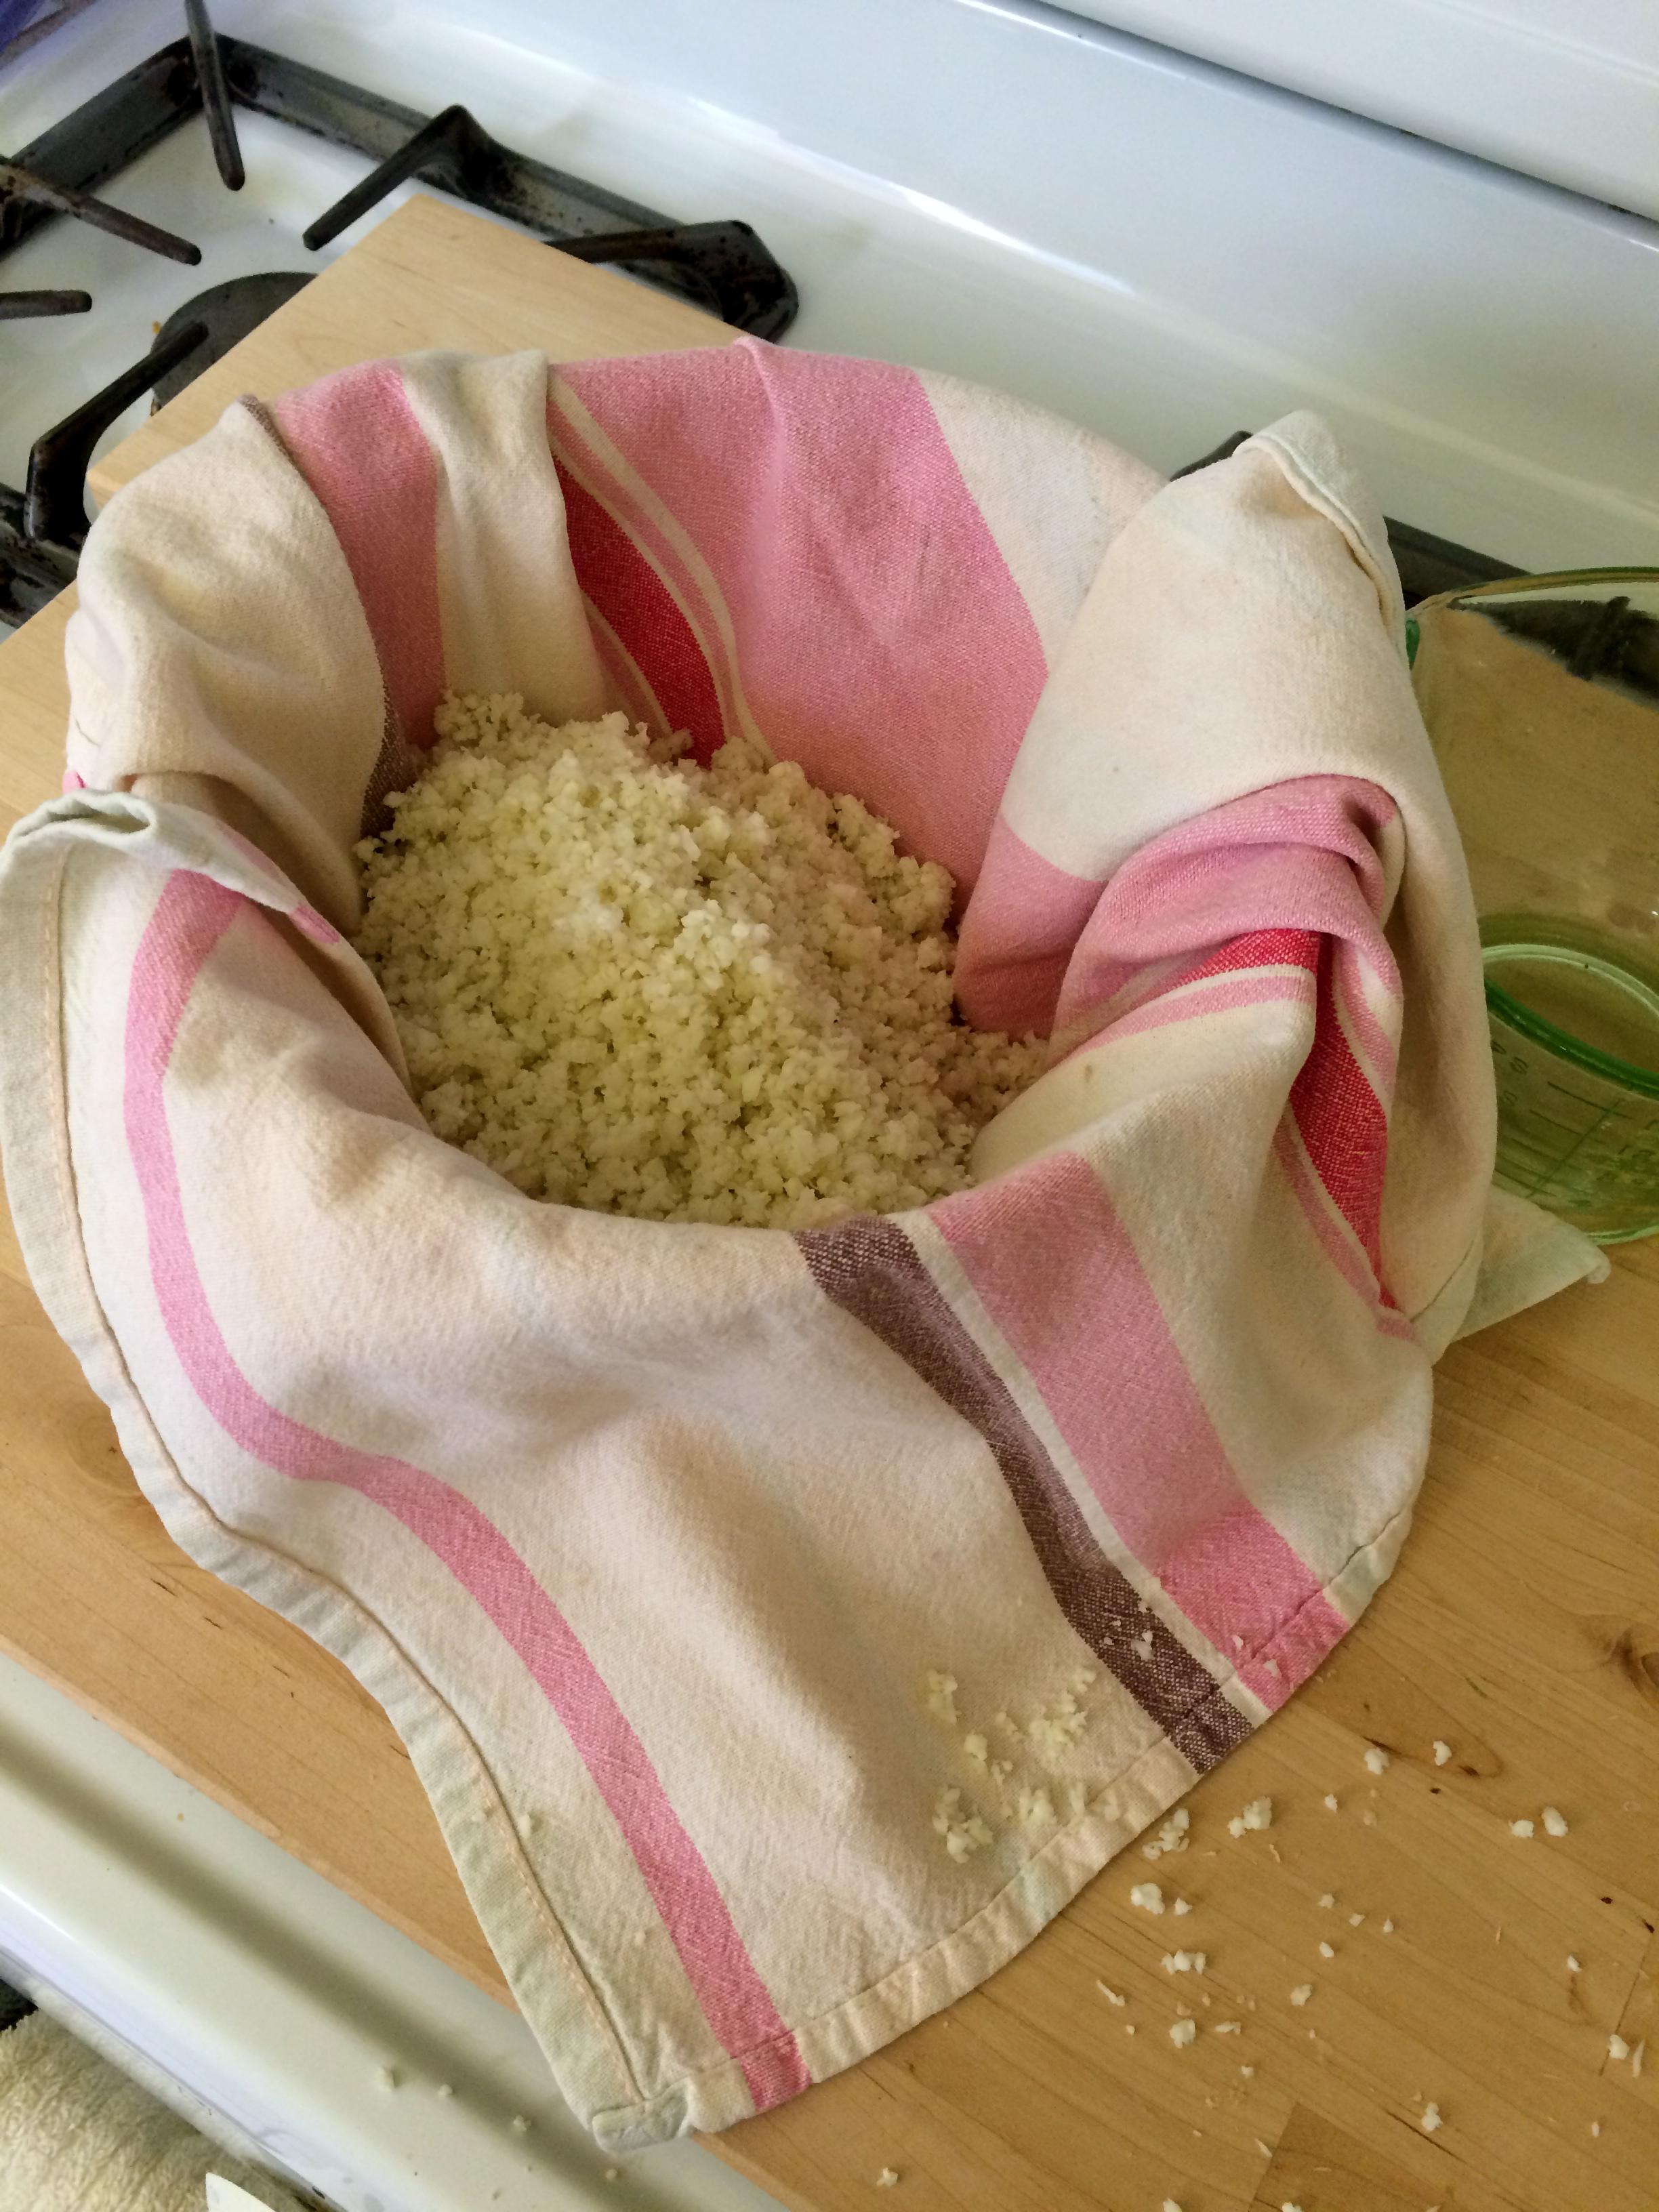
Once the cauliflower has been steamed, then transfer the rice to a mixing bowl that has been lined with a tea towel. Allow the rice to cool down a bit before the next step!

Cauliflower Crust | My Engineered Nutrition

Once cool, gather the towel, forming the rice into a ball and SQUEEZE! You will actually be surprised with how much liquid cauliflower contains. 

Cauliflower Crust | My Engineered Nutrition

This will take a few rounds of twisting and squeezing to make sure all of the liquid has been drained. ​

Cauliflower Crust | My Engineered Nutrition

The end result is a ball of cauliflower "flour" to which you add your egg white, cheese, spices, and coconut flour. I found the coconut flour to really hold this crust together. On my first attempt at making this, I still felt there was a bit too much moisture and needed a binder. The coconut flour seemed to do the trick! Once mixed, you flatten and  bake until golden brown.

The final step is adding toppings, treating the crust like you would any other pre-baked pizza crust!

Cauliflower Crust

Prep Time: 15 minutes

Cook Time: 10-15 minutes

Ingredients

  • 1 small to medium head of cauliflower, yielding about 3.5 cups flowerets (350g)
  • 1/3 cup shredded fat-free or low-fat monterey jack cheese (1.5 oz)
  • 1 egg white
  • 1 tbsp coconut flour
  • 1 tsp italian seasoning (equal parts dried oregano, basil, thyme and rosemary)
  • 1/4 tsp salt

Directions

  1. Preheat oven to 450°. 
  2. Chop cauliflower into small flowerets, discarding of leavings and stem. Place cauliflower into food processor and pulse until you get a "cauliflower rice" consistency. 
  3. Transfer cauliflower to a microwave-safe dish and microwave on high for 3 minutes. This steams the cauliflower. Alternatively, you can also bake the cauliflower for about 10-15 minutes (ensuring it doesn't begin to brown) if you do not have access to a microwave. You will need to spread the cauliflower rice out in a thin layer on baking sheets (this may require 2 sheets).  
  4. Once cooked, transfer cauliflower again to a tea towel lined bowl. Allow to cool for at least 5 minutes. When cool enough to handle, gather up the towel and squeeze the cauliflower into a ball -- and continue to squeeze! I can't stress enough how important it is to squeeze ALL the liquid out of the cauliflower. You should have about 1/2 cup of liquid when you are done. The end result is a ball of cauliflower "flour".
  5. In a mixing bowl combine cauliflower, shredded monterey jack cheese, egg white, coconut flour, seasonings and salt. Mix with hands until ingredients are well incorporated.
  6. On a parchment lined baking sheet flatten out dough, shaping into a thin round disk or a rectangle, about 1/4" thick.
  7. Bake in a 450° oven for 10-15 minutes or until it begins to turn golden.
Posted on September 16, 2015 and filed under Recipes, Vegetables/Sides.